Search
User login
Topic “Individual”
Contains activities for individuals (one on one).
turn taking
| Activity/strategy name and materials required | How to do the activity | Key principles for doing the activity and comments |
|---|---|---|
| Feelie bag Interesting small toys in a bag | Sit child and one other child on chairs in a small circle. Make a show of bringing out the 'feelie bag' and shaking it. Put your hand in and take out a toy. Use it briefly and hand to the child next to you. When this child has had a short go say 'Share with a friend' and if necessary help the child hand the toy over to a peer. Say 'Good sharing' as the child hands over the toy. When a toy has been seen by all offer the bag to a child to put their hand in and take out a toy for sharing Keep going round in the circle till all the toys have been seen | Keep up the pace of these activities so that children don't get too tense having to wait their turn Reward 'good waiting' and 'good sharing' with lots of praise - maybe even a sticker. Some children find waiting very hard and will be helped by having something to hold a small sponge, or squashy ball etc. This is handed over for their turn with the toy and given back after they have passed the toy on. |
| Snack time Small food items e.g. crisps, cut up fruit, biscuits | ||
| Physical games |
Developing the skills to understand and express different emotions
| Activity/strategy name and materials required | How to do the activity | Key principles for doing the activity and comments |
|---|---|---|
| Talking about different emotions - Photographs of different people showing different emotions - you could get these from magazines, newspapers or by internet search. - Emotion symbols - click here to print. - Paper and pens | 1. Look through the photographs together - talk about what feelings or emotions the person is showing - you may have different answers from each other. Talk about why they may be showing emotions. 2. Can you match the symbols to the emotions. Talk about the differences you notice in peoples' faces. 3. Can you think of times when you felt this emotion - use the paper and pens to write this down. Compare your experiences. | You may want to start with basic emotion words such as happy, sad, cross and excited, before introducing more complex emotion words. |
| Feeling Dictionary - Exercise book/note pad/sheets of paper - Emotion symbols - click here to print. You can draw your own if you prefer. | Definitions: Happy: This is when I feel good about something. I might smile or laugh. Sad: This is when I don't feel good about something. I might cry. I might show I feel this way by being cross. Angry / cross: This is what I feel when something is not fair, or is bad. I might feel like shouting or punching or doing something to someone. Bored: This is when I'm not interested in what is happening, and just want it to finish. I might sigh, or lean my head on my hand. Upset: I might feel like this when something is not fair, or when someone is unkind. I might cry, or feel like shouting. Frightened / scared: This is what I might feel if I don't know what is happening, or if I am unsafe. I might cry, or scream, or just try not to move. I might want to find someone I know, like my mum or my teacher. Surprised: this is what I feel when something good happens that I didn't expect. I might smile, open my eyes wide, and say something like 'wow'! Excited: This is what I feel when I know something good is going to happen soon. I might smile, move around, and keep thinking about what is going to happen. | |
| If you're happy and you know it... - Emotion symbols (click here to print)or feelings Dictionary (see above) - Time-line of a day | You could choose a different feeling each day to work through the timeline. You could also display the timeline, and encourage the child / children to identify how they are feeling at different parts of the day. |
give compliments
| Activity/strategy name and materials required | How to do the activity | Key principles for doing the activity and comments |
|---|---|---|
| Brainstorm | Ask the children "what is a compliment? What should you do if someone gives you a compliment?" | You could also talk about "what is criticism?" and "is criticism always bad?" |
| Act it out 'Teen-age' rag dolls | The children could act out giving and receiving criticism. | |
| Give a compliment Cards with names of everyone in the group (including adults) | Take out the name of the person you're offering the cards to, so they can't choose themself. | |
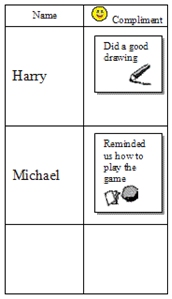
| Compliments Chart Giving and receiving compliments as part of a language group. This is a good way to boost children's self esteem. Materials: Compliment prompt cards, with or without visual support, as appropriate. Compliments chart, with each child's name on the left side, with a space on the right side for the chosen compliment to be stuck. For example:
Blu-tac to stick the compliment cards on to the chart, and the chart on to the wall. | You will need to explain what a compliment is - a positive comment about another person that makes them feel good. It needs to be genuine! You can keep a note of the compliments each child is given over all the sessions of the group. They can get a certificate / note at the end with all their compliments on for them to keep. You can use this with younger children if you help them to think about what a compliment is. If they find it difficult you can make it easier by asking them to 'say something nice' to the person next to them. | |
| Compliments web Ball of string Compliments prompt cards if appropriate. | You will need to explain what a compliment is - a positive comment about another person that makes them feel good. It needs to be genuine! You can use this with younger children if you help them to think about what a compliment is. If they find it difficult you can make it easier by asking them to 'say something nice' to the person next to them. |
Appropriate touch and proximity
| Activity/strategy name and materials required | How to do the activity | Key principles for doing the activity and comments |
|---|---|---|
| Proximity game | Have the children stand facing each other in pairs. Tell them to walk forward until they feel they're the right distance away. Discuss how close you can be to others. | Don't let it turn into a boisterous ' bumping into each other game' |
| Brainstorm Photos of familiar people e.g. adults leading the group, class teacher/s, head teacher, all children in the group, other children from the children's class/es, etc. photos of unfamiliar people e.g. child, baby, man, woman, police officer, shopkeeper/ market stall holder, bus driver, person at ticket booth at station etc. - from Flash-pro or internet image search | ||
| Colouring activity Outline drawing of the body e.g. from "pictures, please" or "language steps" for each child red and green pens/pencils | It's ok if children colour different areas, as they may feel differently about being touched e.g. most girls will say they don't want to be touched on their chests, but boys may say it's ok |
Adjust language in different social contexts
| Activity/strategy name and materials required | How to do the activity | Key principles for doing the activity and comments |
|---|---|---|
| What you would say Photos of familiar people e.g. adults leading the group, class teacher/s, head teacher, all children in the group, other children from the children's class/es, etc. Photos of unfamiliar people e.g. police officer, shopkeeper/ market stall holder, bus driver, person at ticket booth at station etc. - from Flash-pro or internet image search. Comment suggestion cards: comment cards can say things like: Hello Hi, mate How old are you? What's your name? How are you? What do you want? Please can you be quiet Shut up Get out of the way! Get lost! Can you help me, please? Good morning Excuse me Oi, you! Are you a boy or a girl? Alright? | 1. Put the photos where the children can see them and check they can identify who every one is. 2. Have a child pick a comment card and decide which people they could say it to and which people they couldn't 3. children can suggest other comments |
Self other awareness - appearance
| Activity/strategy name and materials required | How to do the activity | Key principles for doing the activity and comments |
|---|---|---|
| Making friends Work sheet for each child - on the right hand side, there should be space to stick the picture, on the left, a cloze procedure passage saying: 'My name is ___________ I am ___ years old I have ____ eyes I have ____skin I have ____ hair I like_________________ I am good at __________ My friend is called ______' Printouts of body, hair, clothes etc from www.makingfriends.com Glue Scissors Mirror (optional) | 1. Print out bodies, hair and clothes from the website - make sure you have the bodies and hair available to allow each child to make a reasonably accurate representation of themselves. 2. Help the children make a picture of themselves using pictures from the website. 3. Add to the pictures to the sheet and help the children fill in the blanks. 4. Ask each child feed back to group. 5. Have a brief discussion of valuing everyone irrespective of colour, looks etc. |
Say how you would feel in situations
| Activity/strategy name and materials required | How to do the activity | Key principles for doing the activity and comments |
|---|---|---|
| How would you feel if?: - Pictures/photos of different emotions - a printable set of emotion cards are available here. | 1. Print and cut out the resources. 2. Introduce the activity by having a quick discussion of how it's fine if different people feel differently about the same situation. 3. Take turns to choose a situation card and discuss it together. See if you can match how you would feel to the emotions symbols or pictures. 4. Some children may be able to explain why they'd feel that way e.g. "I'd be scared if I saw a spider because I don't like them'. | Reinforce the idea that there's no 'right' answer. |
Respond to contradictory emotional messages
| Activity/strategy name and materials required | How to do the activity | Key principles for doing the activity and comments |
|---|---|---|
| How do I really feel? Photo emotions cards (e.g. LDA, Colorcards or from Flash-Pro) showing photos of Happy, Sad and Angry faces | 1. Show the child the pictures and ask them to identify the emotion shown. 2. Help the child to think of alternative names for each emotion (e.g. angry = cross, annoyed, vexed, mad, cheesed off, in a bad temper etc. ...). 3. Put the pictures where the child can see them. 4. Say a sentence in a tone of voice that contradicts the message, e.g. "I'm fine, nothing's wrong with me" in a sad voice. 5. Ask the child to point to the right picture (or say its name) for the emotion you portray 6. Ask the child: "how did I say I was feeling?" and "How did I really feel?" | Try to keep the activity fun by moving on quickly. Be prepared to discuss how the child is feeling if they want to. As an alternative to pointing, put the pictures in different locations in the room and ask the child to stand by the picture they select for the emotion you show. |
Ideas to encourage playing with one friend then playing with someone else
| Activity/strategy name and materials required | How to do the activity | Key principles for doing the activity and comments |
|---|---|---|
| Story Story script - see "Robert's Friend" (https://en.commtap.org/additional-resource/roberts-friend), or make up your own story (two main characters and two others - one of the main characters wants to play with their friend the whole time, and they fall out). | Explain to the child / children that you are going to tell them a story. They need to tell you what the characters did that was good and what was not good. Tell the story, and repeat it. Discuss. Talk about what the characters could do differently. | Make sure you talk about: - Do we need to play together all the time to be friends? - Do friends sometimes play at different games? - What happens if we try and play with one person the whole time? |
| Role-play with puppets Puppets / paper figures Story script used above | ||
| What to do if...your friend wants to play with someone else? A3 sheet of paper pens Flash cards (optional) Puppets (optional) | Key strategies: - Ask someone else to play with you - Choose something else to do - Say, 'ok, see you later'. - Ask an adult to play with you. - Ask if you can join in someone else's game. - Remember that it doesn't mean they don't want to be your friend - they just want to play with someone else for a bit. | |
| 'I would like to play a game with...' card Laminated card 'I would like to play a game with...' Sticky notes Pen Some simple games Timer (optional) | This can be used in the playground, provided there are at least two children who are willing to be chosen. If there are, the activity will be to play a specific game, for a set time, and then to play with someone else. |
Judge if behaviour is being a good friend
| Activity/strategy name and materials required | How to do the activity | Key principles for doing the activity and comments |
|---|---|---|
| Puppet role-play
|
| This is a good activity for group work. You could give the figures to the child / children, and let them generate their own story. Stop the action when a key behaviour occurs and discuss if it was being a good friend and why. |
| Drama
| ||
| Friendship Diary
| If you have not already done this, you may want to brainstorm what sort of things a good friend will do. Make a poster that you can refer to for ideas. Talking about what sort of things a good friend would not do will provide a contrast - you may want to make two posters. This activity could also be carried out by playground supervisors, at the start and end of playtime. You could write their 'friendship mission' down on a card or post-it note to remind the child throughout the day. | |
| Friendship Awards
| This works best in less structured sessions, e.g. in the playground. |
make predictions about what people would say
| Activity/strategy name and materials required | How to do the activity | Key principles for doing the activity and comments |
|---|---|---|
| What are they saying? Pictures of people talking to each other, for example: Picture books (you may need to cover any writing on the page if this distracts the child); Commercially produced pictures (e.g. LDA - Emotions cards, "Passages a decouvrir", etc); Photos (e.g. family snaps, or photos you have specially prepared); Pictures from comics and magazines; Drawings you have done. Pieces of paper cut into the shape of a speech bubble (you can buy speech bubble-shaped post-its from stationers such as Ryman or on-line) Blu-tac (optional) | 1. Show the child the picture you have selected; 2. Encourage them to have a good look at the picture; 3. Encourage them to talk about what is happening in the picture; 4. Encourage them to think about what the people in the pictures might be saying; 5. Stick a speech bubble on the picture so that it is coming out of each person's mouth; 6. Ask what each person is saying; 7. Write this down in the speech bubble (or let the child write it themself). | If the child finds it hard to work out what the person could be saying, encourage them to imagine themselves in the situation and ask what they would say. |
Use a reward chart to modify own behaviour
| Activity/strategy name and materials required | How to do the activity | Key principles for doing the activity and comments | |
|---|---|---|---|
| Work and reward chart with reward toys Bag of small reward toys that are not too noisy for use in class e.g. small bubbles pots from party shops, squeeze balls, spinning toys, 'stocking filler' toys from catalogue companies. Laminated strip of card. Laminated symbols for 'work' and 'reward'. Or, make your own. You will need about 4 of each symbol. Sand timer. | 1. Put the reward toys into a bag and keep them only for reward times. 2. Make the laminated strip and the symbols and keep them in the bag with the reward toys. 3. When the child sits to do a work activity take out the laminated strip and put the 'work' and 'reward' symbols on the strip e.g.:
4. Encourage the child to do the work activity but watch carefully and as soon as the child looks as if they have had enough say 'work is finished......time for reward'. Then take off the first 'work' symbol and point to the 'reward'' symbol as you give the child the reward bag to choose a reward toy from. 5. Turn over the sand timer so the child has a visual reminder of how long they are allowed to use the reward toy for. 6. When the reward time is finished take the 'reward' symbol off the laminated strip and point to the 'work' symbol. 7. In time the child will come to trust that work is followed by a reward. You will be able to vary the length of time you expect a child to work depending on the child's mood and state. By watching the child carefully you will be able to give the child a reward before their behaviour slips into something unacceptable. This ensures that you are always rewarding good behaviour. | Apply this behaviour management technique methodically to get the best results. Be sensitive to the child's changing state. There will be times when the child can only do a very small amount of work and needs lots of reward time. This is OK so long as the adult is managing the arrangement and not the child. Give lots of warm feedback for 'work' and point to the upcoming reward as needed - but don't push the child so far that their behaviour deteriorates and you are not able to reward good behaviour. | |
| Star Chart 'I am working for .........' laminated card A 5 size. Symbols/pictures of motivators, laminated and with a Velcro square on the back to fix to the A5 star chart. Software to help create this. Small counters, smiley faces or stars with small bits of Velcro on the back so that they can be stuck to the star chart as needed. | As a rule make it easy for the child to get a reward to get the system started off. You may want to time the reward e.g. use a 10 minute sand timer or a watch if the child can understand a clock. |
Same and different
| Activity/strategy name and materials required | How to do the activity | Key principles for doing the activity and comments |
|---|---|---|
| Identifying a group of identical things as the same and a final object as different A group of identical objects e.g. red lego bricks/coloured beakers/paint brushes and an object that is quite different. Pictures of identical things e.g. lots of pictures of apples/shoes from the computer. Or photo copy something a number of times Contrast with a different computer image or photo copied item. | Put out the identical objects one at a time and say 'Red lego, red lego' etc 'Look...........the same.' Use a sign/symbol/word to label the things as 'Same'. Make a show of the item that is different. Label as 'Different' with sign/symbol/word. Follow the same procedure with pictures as for working with objects. | Its easier to identify something as different when it is very different from others in the group Extend understanding of this concept to everyday e.g. comment on children who have the same anorak/shoes/dinner and then contrast with a child who is different. |
| Barrier games Colouring -in pictures of house/car/child/snowman etc | ||
| Snap Set of snap cards. |
Activities to develop categorising items by where you find them/location
| Activity/strategy name and materials required | How to do the activity | Key principles for doing the activity and comments |
|---|---|---|
| Soring by location activity | 1. Print and cut out the resource. 2. Choose how many categories your child is going to sort - it may be best to start with 2 or 3, before making it harder by adding extra categories. 3. Shuffle the items to be sorted. Each take a turn at choosing an item, naming it and placing in the correct location. 4. If your child is finding challenging to name items, use some of the strategies in the word finding information sheet linked above. | |
| Make a collage - Paper - Glue - A selection of pictures from your chosen category. |
Developing the skill of sorting items into categories
| Activity/strategy name and materials required | How to do the activity | Key principles for doing the activity and comments |
|---|---|---|
| Sorting items by category - Printable category picture cards: Or use a seletion of your own real objects or pictures. | 1. Print and cut out the large category cards and the small picture cards. 2. Start by sorting items from teo different categories. 3. Place the picture cards from the categories face down. Explain to your child you are going to sort the items into groups. 4. Each take a turn at choosing a picture card, naming them item and placing it in the on the appropriate category card. 5. If your child is able to sort items into two catgories, next attemp items from three different categories. | If your child is finding this task challenging, you can help by searching for an item together.
If your child is able to do this activity, when they select a card, you could ask them to think of another item that belongs to that subcategory but is not in the picture cards. You could also move on to the activities that involve sorting items into subcategories - click here. |
Support Commtap to keep it online
Thank you for visiting Commtap.
Please read this message as it is extremely important.
- Visitor donations mean we can continue to host over 1,000 free activities to support speech, language, and communication development.
- Visitor donations mean we can continue to provide free resources to address a wide range of communication needs, including limited speech or language, interaction challenges, and needs associated with conditions such as developmental language disorder, autism, and cerebral palsy.
- Visitor donations mean we can continue to provide resources to support the work of speech and language therapists, teachers, teaching assistants, parents, and carers.
- Visitor donations mean we can continue to provide the free key word sign dictionary (bks.org.uk) which has over 2,000 Makaton and Signalong signs.
We know that not everyone is able to afford to pay to access these resources, however, if you can, please make a donation to keep the site going.
Thank you

Google ads on this page are provided by Google Adsense - and their presence does not imply any endorsement by Commtap. Report a problem with an ad on this page. Log in (for free) to avoid seeing Google ads.