Search
User login
Topic “Primary (5-11yrs)”
Primary school age (5-11 years)
Remain on task for 20 minutes
| Activity/strategy name and materials required | How to do the activity | Key principles for doing the activity and comments |
|---|---|---|
| Good Sitting, Good Looking, Good Listening poster Poster showing good sitting, good looking and good listening | Use the poster to talk about how we do good listening and why we do it (to help us learn, so that we know what to do) Put the poster up near the child, and use it as a visual prompt. | It is important that the child knows how to do good listening. You could role play doing good listening and not doing good listening and discuss the differences. |
| Visual Timetable Laminated symbols for the class activities Sticky-backed Velcro or BluTac, A way to indicate an activity is finished: finished box, board marker or finished crosses. You can find appropriate symbols in the Commtap Symboliser. | This is a strategy which benefits the whole class, particularly children who are learning English as a second language, or who have behavioural difficulties, or who have speech and language difficulties, or who have memory difficulties. It allows the child to know what is coming next, and to remember that the particular activity he/she is doing is for a limited time only. This helps him/her to focus his attention. It is vital that you are consistent in using the visual timetable - it doesn't take long to do! | |
| Individual task schedule. Laminated symbols for the tasks the child will be doing. Laminated symbols for appropriate rewards, e.g. read a book, add a bean to the jar, get a sticker, etc. Sticky-backed Velcro or BluTac, A stiff board / card (A4 or A5 size) You can find appropriate symbols in the Commtap Symboliser. | It is helpful to break a large task into smaller units, so that the child achieves several smaller goals (taking a symbol off for each one) Rewards need to be appropriate to the child and if possible part of existing reward systems in the class. Rewards that can be enjoyed immediately are the most motivating! |
Requests help or other actions
| Activity/strategy name and materials required | How to do the activity | Key principles for doing the activity and comments |
|---|---|---|
| Sabotage! - supported with a picture symbol A ‘HELP’ picture symbol Container the child can see into but can't open e.g. screw-top jar/zip-top bag etc which contains a motivating reward e.g. crisp, raisin, sticker. You can get symbols with the Commtap Symboliser.
|
| When the child has successfully indicated they want help, give them that help - otherwise the child will become extremely frustrated. |
| Sabotage! - supported with a sign Container the child can see into but can't open e.g. screw-top jar/zip-top bag etc which contains a motivating reward e.g. crisp, raisin, sticker. Make sure you know the sign for help before doing the activity (e.g. Signalong, Makaton). | When the child has successfully indicated they want help, give them that help - otherwise the child will become extremely frustrated. Over time you will want to encourage the child to use a clearer indication that they want help. You can do this by:
| |
| Impossible task! Materials as needed, for example:
| See also: https://en.commtap.org/language-communication/initiate-request-items-do-task Note, for most of these examples the child could potentially ask you for a specific item, or ask you for help - both are valid! You can easily integrate this into many classroom activities without the need for any extra equipment. |
Use a visual timetable
| Activity/strategy name and materials required | How to do the activity | Key principles for doing the activity and comments | |
|---|---|---|---|
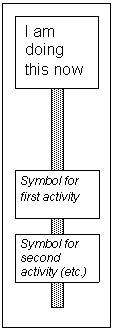
| Using a visual timetable Home made visual timetable with 'finished' box or envelope and Velcro strip. Set of laminated symbols for timetable activities e.g. 'swimming', 'maths', 'carpet time' with scratchy Velcro on the back. You can create symbols cards in PowerPoint with the Commtap Symboliser. | 1. Make a long cardboard strip approximately 10cm wide and 60cm long. Attach a 'FINISHED' box or plastic envelop at the bottom of the strip. 2. Stick a strip of soft Velcro along the centre of the long laminated strip e.g.
3. Arrange symbols of the activities a child will cover for - say - a morning down the Velcro strip. 4. Just before an activity starts help the child put the relevant symbol into the 'I am doing this now' area at the top of the laminated strip. This shows the child what to expect to happen now. 5. When the activity is over help the child remove the symbol for the 'I am doing this now' area and post it into the 'FINISHED' box or envelope. Help the child take the next symbol and put it into the 'I am doing this now' area etc. | This technique helps children understand what is going to happen during the day. Use it with children who are anxious about change or find understanding class routines difficult. It is best to set up a visual timetable before the child comes into school and to set it up for a limited period say from arrival until the first play and then from after play until lunch and then a final set up for the afternoon period. Children sometimes try to alter the timetable to suit themselves e.g. putting play up near the top! This is not allowed! Only the adult in charge can change the order on a visual timetable. If following the set timetable for a given period is very difficult for a child you can make it easier by shortening the time a child must spend on each activity - but each activity must be done a little bit. You can try with just two activities (now/next) see the now/next visual timetable activity below. | |
| Now/next visual timetable "Now /next" visual timetable with 'finished' box or envelope and Velcro strip. Set of laminated photos for timetable activities e.g. 'story', 'outside', 'carpet time' with Velcro on the back. | If the child is resistant to some of the activities it's important to use clear consistent language e.g."first story, then sand". Being able to see a motivating activity coming up may mean that the child is happier to engage in less motivating activities. |
follows familiar routines
| Activity/strategy name and materials required | How to do the activity | Key principles for doing the activity and comments |
|---|---|---|
| At playtime puts on/off coat | Make a picture of child with coat on and coat off. Laminate if possible. Show the child the relevant picture before/after play and help take coat on/off. As you do use the same phrase to describe your action e.g. 'Coat on' or 'Coat off'. As child becomes used to this routine stand back a little and see if the child will do own coat? Will child do own coat if you just ask without using the pictures and eventually will the child follow the routine appropriately with no support? | Be consistent with using the picture supports and using the same phrases to describe actions. Allow the child time to make an attempt - even if the coat is wrong way round - if this happens - praise the child for trying e.g 'Good putting coat on - you want more help' |
| At tidy up time puts things away Tidy up box/bag Toys to tidy | ||
| Line up time Picture of line up time |
able to join in action songs with a group of children
| Activity/strategy name and materials required | How to do the activity | Key principles for doing the activity and comments |
|---|---|---|
| Old MacDonald Pictures of animals A good singing voice!! | Children sit in a circle and start to sing. After, "and on that farm he had a......" a child is chosen to choose a picture and sign the animal. Group continues to sing. Next verse a different child chooses an animal | Always encourage the child to sign the animal name alongside the other children. Ask the child "What's that?" when they choose the animal picture so the child is given an opportunity to spontaneously sign the animal. |
| Wheels on the bus Card with prompts for actions (optional) | Child can point to the card or do an action to indicate which verse to sing next. Give choices, "Shall we sing wipers or wheels next?" etc. | |
| If you're happy and you know it Card with prompts for actions: clap/stamp etc. (optional) | Child can point to the card or do an action to indicate which verse to sing next. Give choices, "Shall we clap or stamp next?" etc. |
turn taking
| Activity/strategy name and materials required | How to do the activity | Key principles for doing the activity and comments |
|---|---|---|
| Feelie bag Interesting small toys in a bag | Sit child and one other child on chairs in a small circle. Make a show of bringing out the 'feelie bag' and shaking it. Put your hand in and take out a toy. Use it briefly and hand to the child next to you. When this child has had a short go say 'Share with a friend' and if necessary help the child hand the toy over to a peer. Say 'Good sharing' as the child hands over the toy. When a toy has been seen by all offer the bag to a child to put their hand in and take out a toy for sharing Keep going round in the circle till all the toys have been seen | Keep up the pace of these activities so that children don't get too tense having to wait their turn Reward 'good waiting' and 'good sharing' with lots of praise - maybe even a sticker. Some children find waiting very hard and will be helped by having something to hold a small sponge, or squashy ball etc. This is handed over for their turn with the toy and given back after they have passed the toy on. |
| Snack time Small food items e.g. crisps, cut up fruit, biscuits | ||
| Physical games |
Developing the skills to understand and express different emotions
| Activity/strategy name and materials required | How to do the activity | Key principles for doing the activity and comments |
|---|---|---|
| Talking about different emotions - Photographs of different people showing different emotions - you could get these from magazines, newspapers or by internet search. - Emotion symbols - click here to print. - Paper and pens | 1. Look through the photographs together - talk about what feelings or emotions the person is showing - you may have different answers from each other. Talk about why they may be showing emotions. 2. Can you match the symbols to the emotions. Talk about the differences you notice in peoples' faces. 3. Can you think of times when you felt this emotion - use the paper and pens to write this down. Compare your experiences. | You may want to start with basic emotion words such as happy, sad, cross and excited, before introducing more complex emotion words. |
| Feeling Dictionary - Exercise book/note pad/sheets of paper - Emotion symbols - click here to print. You can draw your own if you prefer. | Definitions: Happy: This is when I feel good about something. I might smile or laugh. Sad: This is when I don't feel good about something. I might cry. I might show I feel this way by being cross. Angry / cross: This is what I feel when something is not fair, or is bad. I might feel like shouting or punching or doing something to someone. Bored: This is when I'm not interested in what is happening, and just want it to finish. I might sigh, or lean my head on my hand. Upset: I might feel like this when something is not fair, or when someone is unkind. I might cry, or feel like shouting. Frightened / scared: This is what I might feel if I don't know what is happening, or if I am unsafe. I might cry, or scream, or just try not to move. I might want to find someone I know, like my mum or my teacher. Surprised: this is what I feel when something good happens that I didn't expect. I might smile, open my eyes wide, and say something like 'wow'! Excited: This is what I feel when I know something good is going to happen soon. I might smile, move around, and keep thinking about what is going to happen. | |
| If you're happy and you know it... - Emotion symbols (click here to print)or feelings Dictionary (see above) - Time-line of a day | You could choose a different feeling each day to work through the timeline. You could also display the timeline, and encourage the child / children to identify how they are feeling at different parts of the day. |
give compliments
| Activity/strategy name and materials required | How to do the activity | Key principles for doing the activity and comments |
|---|---|---|
| Brainstorm | Ask the children "what is a compliment? What should you do if someone gives you a compliment?" | You could also talk about "what is criticism?" and "is criticism always bad?" |
| Act it out 'Teen-age' rag dolls | The children could act out giving and receiving criticism. | |
| Give a compliment Cards with names of everyone in the group (including adults) | Take out the name of the person you're offering the cards to, so they can't choose themself. | |
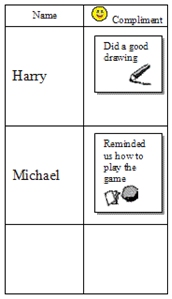
| Compliments Chart Giving and receiving compliments as part of a language group. This is a good way to boost children's self esteem. Materials: Compliment prompt cards, with or without visual support, as appropriate. Compliments chart, with each child's name on the left side, with a space on the right side for the chosen compliment to be stuck. For example:
Blu-tac to stick the compliment cards on to the chart, and the chart on to the wall. | You will need to explain what a compliment is - a positive comment about another person that makes them feel good. It needs to be genuine! You can keep a note of the compliments each child is given over all the sessions of the group. They can get a certificate / note at the end with all their compliments on for them to keep. You can use this with younger children if you help them to think about what a compliment is. If they find it difficult you can make it easier by asking them to 'say something nice' to the person next to them. | |
| Compliments web Ball of string Compliments prompt cards if appropriate. | You will need to explain what a compliment is - a positive comment about another person that makes them feel good. It needs to be genuine! You can use this with younger children if you help them to think about what a compliment is. If they find it difficult you can make it easier by asking them to 'say something nice' to the person next to them. |
Appropriate touch and proximity
| Activity/strategy name and materials required | How to do the activity | Key principles for doing the activity and comments |
|---|---|---|
| Proximity game | Have the children stand facing each other in pairs. Tell them to walk forward until they feel they're the right distance away. Discuss how close you can be to others. | Don't let it turn into a boisterous ' bumping into each other game' |
| Brainstorm Photos of familiar people e.g. adults leading the group, class teacher/s, head teacher, all children in the group, other children from the children's class/es, etc. photos of unfamiliar people e.g. child, baby, man, woman, police officer, shopkeeper/ market stall holder, bus driver, person at ticket booth at station etc. - from Flash-pro or internet image search | ||
| Colouring activity Outline drawing of the body e.g. from "pictures, please" or "language steps" for each child red and green pens/pencils | It's ok if children colour different areas, as they may feel differently about being touched e.g. most girls will say they don't want to be touched on their chests, but boys may say it's ok |
Adjust language in different social contexts
| Activity/strategy name and materials required | How to do the activity | Key principles for doing the activity and comments |
|---|---|---|
| What you would say Photos of familiar people e.g. adults leading the group, class teacher/s, head teacher, all children in the group, other children from the children's class/es, etc. Photos of unfamiliar people e.g. police officer, shopkeeper/ market stall holder, bus driver, person at ticket booth at station etc. - from Flash-pro or internet image search. Comment suggestion cards: comment cards can say things like: Hello Hi, mate How old are you? What's your name? How are you? What do you want? Please can you be quiet Shut up Get out of the way! Get lost! Can you help me, please? Good morning Excuse me Oi, you! Are you a boy or a girl? Alright? | 1. Put the photos where the children can see them and check they can identify who every one is. 2. Have a child pick a comment card and decide which people they could say it to and which people they couldn't 3. children can suggest other comments |
Self other awareness - appearance
| Activity/strategy name and materials required | How to do the activity | Key principles for doing the activity and comments |
|---|---|---|
| Making friends Work sheet for each child - on the right hand side, there should be space to stick the picture, on the left, a cloze procedure passage saying: 'My name is ___________ I am ___ years old I have ____ eyes I have ____skin I have ____ hair I like_________________ I am good at __________ My friend is called ______' Printouts of body, hair, clothes etc from www.makingfriends.com Glue Scissors Mirror (optional) | 1. Print out bodies, hair and clothes from the website - make sure you have the bodies and hair available to allow each child to make a reasonably accurate representation of themselves. 2. Help the children make a picture of themselves using pictures from the website. 3. Add to the pictures to the sheet and help the children fill in the blanks. 4. Ask each child feed back to group. 5. Have a brief discussion of valuing everyone irrespective of colour, looks etc. |
Say how you would feel in situations
| Activity/strategy name and materials required | How to do the activity | Key principles for doing the activity and comments |
|---|---|---|
| How would you feel if?: - Pictures/photos of different emotions - a printable set of emotion cards are available here. | 1. Print and cut out the resources. 2. Introduce the activity by having a quick discussion of how it's fine if different people feel differently about the same situation. 3. Take turns to choose a situation card and discuss it together. See if you can match how you would feel to the emotions symbols or pictures. 4. Some children may be able to explain why they'd feel that way e.g. "I'd be scared if I saw a spider because I don't like them'. | Reinforce the idea that there's no 'right' answer. |
Respond to contradictory emotional messages
| Activity/strategy name and materials required | How to do the activity | Key principles for doing the activity and comments |
|---|---|---|
| How do I really feel? Photo emotions cards (e.g. LDA, Colorcards or from Flash-Pro) showing photos of Happy, Sad and Angry faces | 1. Show the child the pictures and ask them to identify the emotion shown. 2. Help the child to think of alternative names for each emotion (e.g. angry = cross, annoyed, vexed, mad, cheesed off, in a bad temper etc. ...). 3. Put the pictures where the child can see them. 4. Say a sentence in a tone of voice that contradicts the message, e.g. "I'm fine, nothing's wrong with me" in a sad voice. 5. Ask the child to point to the right picture (or say its name) for the emotion you portray 6. Ask the child: "how did I say I was feeling?" and "How did I really feel?" | Try to keep the activity fun by moving on quickly. Be prepared to discuss how the child is feeling if they want to. As an alternative to pointing, put the pictures in different locations in the room and ask the child to stand by the picture they select for the emotion you show. |
Ideas to encourage playing with one friend then playing with someone else
| Activity/strategy name and materials required | How to do the activity | Key principles for doing the activity and comments |
|---|---|---|
| Story Story script - see "Robert's Friend" (https://en.commtap.org/additional-resource/roberts-friend), or make up your own story (two main characters and two others - one of the main characters wants to play with their friend the whole time, and they fall out). | Explain to the child / children that you are going to tell them a story. They need to tell you what the characters did that was good and what was not good. Tell the story, and repeat it. Discuss. Talk about what the characters could do differently. | Make sure you talk about: - Do we need to play together all the time to be friends? - Do friends sometimes play at different games? - What happens if we try and play with one person the whole time? |
| Role-play with puppets Puppets / paper figures Story script used above | ||
| What to do if...your friend wants to play with someone else? A3 sheet of paper pens Flash cards (optional) Puppets (optional) | Key strategies: - Ask someone else to play with you - Choose something else to do - Say, 'ok, see you later'. - Ask an adult to play with you. - Ask if you can join in someone else's game. - Remember that it doesn't mean they don't want to be your friend - they just want to play with someone else for a bit. | |
| 'I would like to play a game with...' card Laminated card 'I would like to play a game with...' Sticky notes Pen Some simple games Timer (optional) | This can be used in the playground, provided there are at least two children who are willing to be chosen. If there are, the activity will be to play a specific game, for a set time, and then to play with someone else. |
To be able to display and interpret different emotions
| Activity/strategy name and materials required | How to do the activity | Key principles for doing the activity and comments |
|---|---|---|
| Emotions game Group game for a minimum of three people
| 1. Shuffle the emotions cards and put one face up in each of the spaces on the 1-6 grid. 2. Check the children/young person know what each card says and what the emotion is (remove any that are too difficult and put new cards in their place). 3. Let everyone choose a coloured counter. Everyone puts one of their counters on the “start”. 4. Choose one person to start (perhaps the adult should go first). 5. The person who starts shakes the dice in the cup, and puts the cup upside down on the table. Carefully lift up the cup and look at the dice so only you know which number is on top. Look at the emotions cards on the board to see which emotion corresponds to the number on the dice – but don’t say what it is. 6. Pick a phrase card. Read the phrase on the card, displaying the emotion you have been given. Use your voice and gestures. It’s fine to give children help in reading what the phrase is, but not in how to display the emotion! 7. The other players watch the player acting out the emotion. They decide which of the emotions the player is portraying. They put their other counter on the name of the emotion they have chosen. 8. When everyone has voted, the player who acted the emotion lifts up the cup to show which number was on the dice. 9. Check to see who chose the correct emotion. The people who chose correctly move their counter on to the next space 10. The player who acted also moves their counter on the same number of orange spaces as the number of people who guessed correctly. 11. The next player then has a turn to act. Continue until someone has reached the “finish” space. | This game rewards your child/young person for doing good acting as well as good interpreting; therefore, there is an incentive to display the emotion correctly. Using the coloured counters to "vote" for an emotion prevents people from changing their mind. If the game takes too long to play, use only the orange spaces on the board. |
Support Commtap to keep it online
Thank you for visiting Commtap.
Please read this message as it is extremely important.
- Visitor donations mean we can continue to host over 1,000 free activities to support speech, language, and communication development.
- Visitor donations mean we can continue to provide free resources to address a wide range of communication needs, including limited speech or language, interaction challenges, and needs associated with conditions such as developmental language disorder, autism, and cerebral palsy.
- Visitor donations mean we can continue to provide resources to support the work of speech and language therapists, teachers, teaching assistants, parents, and carers.
- Visitor donations mean we can continue to provide the free key word sign dictionary (bks.org.uk) which has over 2,000 Makaton and Signalong signs.
We know that not everyone is able to afford to pay to access these resources, however, if you can, please make a donation to keep the site going.
Thank you

Google ads on this page are provided by Google Adsense - and their presence does not imply any endorsement by Commtap. Report a problem with an ad on this page. Log in (for free) to avoid seeing Google ads.