Search
User login
Topic “Level 3”
"Reordering perception"
Examples of contexts and questions From Blank, Rose, and Berlin (1978):- A. Scanning for an object by integrating verbal with visual information (Find one to use with...)
- B. Describing events subsequent to a scene (What will happen next?)
- C. Assuming the role of another person (What could...say?)
- D. Following a set of instructions (Do this... then this...)
- E. Arranging pictures in a sequence (Make these into... )
- F. Formulating a set of directions (Tell me how...)
- G. Formulating a generalization about a set of events (What happened to all of these?)
- H. Formulating a statement to unify a sequence of pictures (Tell this story)
- I. Concepts: Identifying similarities (How are these the same?)
- J. Concepts: Selecting an object by exclusion (What else...?)
- K. Concepts: Selecting a set of objects by exclusion (Find the things that are not...)
- L. Concepts: Citing an example by excluding a specific object (Name something that can... but is not a...)
- M. Concepts: Citing an example by excluding a class of objects (Name something that is not a...)
- N. Concepts: Defining words (What is a...?)
- O. Unusual imitations (Say this...)
Reference
Blank M., Rose S., and Berlin L. (1978) "The Language of Learning: The Preschool Years". Grune and Stratton, New York.
Blank's Levels of Discourse and the associated descriptions quoted from Blank, Rose and Berlin (1978) are used on Commtap by kind permission of Dr. Marion Blank. Marion Blank's software programmes Reading Kingdom and ASD Reading use the ideas developed in this discourse model.
identify and discuss errors made by others
| Activity/strategy name and materials required | How to do the activity | Key principles for doing the activity and comments |
|---|---|---|
| What's wrong pictures What's wrong pictures (e.g. LDA, Colorcards) Pen and paper | 1. Choose a picture (or let the child choose one). Both people look at it. Take it in turns to describe the picture and say how it should look. Make sure you have a new picture to describe each time. 2. Take it in turns to choose a picture, which you keep hidden from the other person. Describe the picture while the other person tries to draw it based on your description. Compare the drawing to the original picture and say how the picture should look. If the drawing does not look very much like the picture, say why this went wrong. | |
| Did I get it right? Large composite pictures (e.g. "passages a decouvrir"). Score sheet (2 columns - one with your name at the top, the other with the child's) Pen | Some children find it extremely difficult to correct adults, even if the adult's mistake means the child gets something wrong (for example colouring a banana blue because the adult passed the wrong pen). You may need to reassure the child that it's ok to correct you. |
Able to play cooperatively
| Activity/strategy name and materials required | How to do the activity | Key principles for doing the activity and comments |
|---|---|---|
| Marble run game Marble run Waiting cards (as required) | 1. Set up the track and pass the marbles round the children. When everyone has had one go say 'Who's turn next?' You want the children to name the next child in the circle and to pass the marbles with as little prompting as possible. Some children may need handover hand modelling to pass the marbles. 2. The target child may need to hold a waiting card to support waiting for their turn. | Keep this activity for the end of a small group work session. Keep the activity short and snappy so that the children keep motivated. Choose really interesting toys for this activity that the children don't have general access to. |
| Any other high interest activity game that can be used in a small group | ||
| Toys from a bag A bag with a selection of appealing toys inside. |
Developing the skills to understand and express different emotions
| Activity/strategy name and materials required | How to do the activity | Key principles for doing the activity and comments |
|---|---|---|
| Talking about different emotions - Photographs of different people showing different emotions - you could get these from magazines, newspapers or by internet search. - Emotion symbols - click here to print. - Paper and pens | 1. Look through the photographs together - talk about what feelings or emotions the person is showing - you may have different answers from each other. Talk about why they may be showing emotions. 2. Can you match the symbols to the emotions. Talk about the differences you notice in peoples' faces. 3. Can you think of times when you felt this emotion - use the paper and pens to write this down. Compare your experiences. | You may want to start with basic emotion words such as happy, sad, cross and excited, before introducing more complex emotion words. |
| Feeling Dictionary - Exercise book/note pad/sheets of paper - Emotion symbols - click here to print. You can draw your own if you prefer. | Definitions: Happy: This is when I feel good about something. I might smile or laugh. Sad: This is when I don't feel good about something. I might cry. I might show I feel this way by being cross. Angry / cross: This is what I feel when something is not fair, or is bad. I might feel like shouting or punching or doing something to someone. Bored: This is when I'm not interested in what is happening, and just want it to finish. I might sigh, or lean my head on my hand. Upset: I might feel like this when something is not fair, or when someone is unkind. I might cry, or feel like shouting. Frightened / scared: This is what I might feel if I don't know what is happening, or if I am unsafe. I might cry, or scream, or just try not to move. I might want to find someone I know, like my mum or my teacher. Surprised: this is what I feel when something good happens that I didn't expect. I might smile, open my eyes wide, and say something like 'wow'! Excited: This is what I feel when I know something good is going to happen soon. I might smile, move around, and keep thinking about what is going to happen. | |
| If you're happy and you know it... - Emotion symbols (click here to print)or feelings Dictionary (see above) - Time-line of a day | You could choose a different feeling each day to work through the timeline. You could also display the timeline, and encourage the child / children to identify how they are feeling at different parts of the day. |
give compliments
| Activity/strategy name and materials required | How to do the activity | Key principles for doing the activity and comments |
|---|---|---|
| Brainstorm | Ask the children "what is a compliment? What should you do if someone gives you a compliment?" | You could also talk about "what is criticism?" and "is criticism always bad?" |
| Act it out 'Teen-age' rag dolls | The children could act out giving and receiving criticism. | |
| Give a compliment Cards with names of everyone in the group (including adults) | Take out the name of the person you're offering the cards to, so they can't choose themself. | |
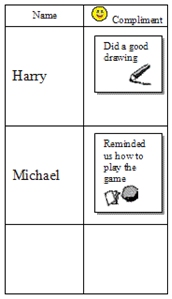
| Compliments Chart Giving and receiving compliments as part of a language group. This is a good way to boost children's self esteem. Materials: Compliment prompt cards, with or without visual support, as appropriate. Compliments chart, with each child's name on the left side, with a space on the right side for the chosen compliment to be stuck. For example:
Blu-tac to stick the compliment cards on to the chart, and the chart on to the wall. | You will need to explain what a compliment is - a positive comment about another person that makes them feel good. It needs to be genuine! You can keep a note of the compliments each child is given over all the sessions of the group. They can get a certificate / note at the end with all their compliments on for them to keep. You can use this with younger children if you help them to think about what a compliment is. If they find it difficult you can make it easier by asking them to 'say something nice' to the person next to them. | |
| Compliments web Ball of string Compliments prompt cards if appropriate. | You will need to explain what a compliment is - a positive comment about another person that makes them feel good. It needs to be genuine! You can use this with younger children if you help them to think about what a compliment is. If they find it difficult you can make it easier by asking them to 'say something nice' to the person next to them. |
Say how you would feel in situations
| Activity/strategy name and materials required | How to do the activity | Key principles for doing the activity and comments |
|---|---|---|
| How would you feel if?: - Pictures/photos of different emotions - a printable set of emotion cards are available here. | 1. Print and cut out the resources. 2. Introduce the activity by having a quick discussion of how it's fine if different people feel differently about the same situation. 3. Take turns to choose a situation card and discuss it together. See if you can match how you would feel to the emotions symbols or pictures. 4. Some children may be able to explain why they'd feel that way e.g. "I'd be scared if I saw a spider because I don't like them'. | Reinforce the idea that there's no 'right' answer. |
Ideas to encourage playing with one friend then playing with someone else
| Activity/strategy name and materials required | How to do the activity | Key principles for doing the activity and comments |
|---|---|---|
| Story Story script - see "Robert's Friend" (https://en.commtap.org/additional-resource/roberts-friend), or make up your own story (two main characters and two others - one of the main characters wants to play with their friend the whole time, and they fall out). | Explain to the child / children that you are going to tell them a story. They need to tell you what the characters did that was good and what was not good. Tell the story, and repeat it. Discuss. Talk about what the characters could do differently. | Make sure you talk about: - Do we need to play together all the time to be friends? - Do friends sometimes play at different games? - What happens if we try and play with one person the whole time? |
| Role-play with puppets Puppets / paper figures Story script used above | ||
| What to do if...your friend wants to play with someone else? A3 sheet of paper pens Flash cards (optional) Puppets (optional) | Key strategies: - Ask someone else to play with you - Choose something else to do - Say, 'ok, see you later'. - Ask an adult to play with you. - Ask if you can join in someone else's game. - Remember that it doesn't mean they don't want to be your friend - they just want to play with someone else for a bit. | |
| 'I would like to play a game with...' card Laminated card 'I would like to play a game with...' Sticky notes Pen Some simple games Timer (optional) | This can be used in the playground, provided there are at least two children who are willing to be chosen. If there are, the activity will be to play a specific game, for a set time, and then to play with someone else. |
To be able to display and interpret different emotions
| Activity/strategy name and materials required | How to do the activity | Key principles for doing the activity and comments |
|---|---|---|
| Emotions game Group game for a minimum of three people
| 1. Shuffle the emotions cards and put one face up in each of the spaces on the 1-6 grid. 2. Check the children/young person know what each card says and what the emotion is (remove any that are too difficult and put new cards in their place). 3. Let everyone choose a coloured counter. Everyone puts one of their counters on the “start”. 4. Choose one person to start (perhaps the adult should go first). 5. The person who starts shakes the dice in the cup, and puts the cup upside down on the table. Carefully lift up the cup and look at the dice so only you know which number is on top. Look at the emotions cards on the board to see which emotion corresponds to the number on the dice – but don’t say what it is. 6. Pick a phrase card. Read the phrase on the card, displaying the emotion you have been given. Use your voice and gestures. It’s fine to give children help in reading what the phrase is, but not in how to display the emotion! 7. The other players watch the player acting out the emotion. They decide which of the emotions the player is portraying. They put their other counter on the name of the emotion they have chosen. 8. When everyone has voted, the player who acted the emotion lifts up the cup to show which number was on the dice. 9. Check to see who chose the correct emotion. The people who chose correctly move their counter on to the next space 10. The player who acted also moves their counter on the same number of orange spaces as the number of people who guessed correctly. 11. The next player then has a turn to act. Continue until someone has reached the “finish” space. | This game rewards your child/young person for doing good acting as well as good interpreting; therefore, there is an incentive to display the emotion correctly. Using the coloured counters to "vote" for an emotion prevents people from changing their mind. If the game takes too long to play, use only the orange spaces on the board. |
make predictions about what people would say
| Activity/strategy name and materials required | How to do the activity | Key principles for doing the activity and comments |
|---|---|---|
| What are they saying? Pictures of people talking to each other, for example: Picture books (you may need to cover any writing on the page if this distracts the child); Commercially produced pictures (e.g. LDA - Emotions cards, "Passages a decouvrir", etc); Photos (e.g. family snaps, or photos you have specially prepared); Pictures from comics and magazines; Drawings you have done. Pieces of paper cut into the shape of a speech bubble (you can buy speech bubble-shaped post-its from stationers such as Ryman or on-line) Blu-tac (optional) | 1. Show the child the picture you have selected; 2. Encourage them to have a good look at the picture; 3. Encourage them to talk about what is happening in the picture; 4. Encourage them to think about what the people in the pictures might be saying; 5. Stick a speech bubble on the picture so that it is coming out of each person's mouth; 6. Ask what each person is saying; 7. Write this down in the speech bubble (or let the child write it themself). | If the child finds it hard to work out what the person could be saying, encourage them to imagine themselves in the situation and ask what they would say. |
Categories - to recognise the odd one out
| Activity/strategy name and materials required | How to do the activity | Key principles for doing the activity and comments |
|---|---|---|
| What's in the bag - Draw string bag - Sets of objects, for example: Groups of pens, cars, Lego bricks. - You could also use objects which differ markedly in texture, for example six normal pieces of paper and a piece of sandpaper. If you do not have obejcts available you could print out and use a selection of category cards below: | 1. Put a group of objects/pictures into a bag and add one clearly different object/picutre. 2. Take turns taking things out of the bag and saying/signing what they are. 3. Comment on the item that is different, for example "look... this is the odd one out" or "this is different" (look surprised, puzzled, make an exclamation). | |
| Odd one out pictures |
To order three daily events using pictures
| Activity/strategy name and materials required | How to do the activity | Key principles for doing the activity and comments |
|---|---|---|
| Picture sequences with first/next/last template This is a preparatory activity for working on sequencing daily events. See also the following (at www.commtap.org): Sequences three or more pictures; Sequences three pictures with first next last; Sequence pictures symbols words Materials required: Your own or commercially produced sequencing cards (e.g. Black Sheep press - see "general resources"), Colorcards - available from many educational suppliers) FIRST/LAST template which looks like this (leaving spaces to put the pictures): FIRST LAST FIRST/NEXT/LAST template, as follows (leave spaces for the pictures): FIRST NEXT LAST | 1. Use the first/last template to model the sequence of first and last. 2. Start with 2 picture sequences of a simple event e.g. 'rain falling' 'girl puts up umbrella'. 3. Talk about the pictures. Ask the child 'What is happening in the first picture?' Discuss the consequences of the first picture (getting wet) and what the girl does (puts up the umbrella) 4. Put the two pictures into the template: one in the FIRST column and the other in the LAST column. 5. Do this with a range of 2 sequence picture stories. 6. Turn the cards face down and take turns to turn them over and put them in the right part of the FIRST/LAST template. Can the child tell the story? 7. When the child is confident using the FIRST LAST template to order 2 picture sequences move onto using 3 picture sequences and use the FIRST/NEXT/LAST template. 8. Follow the procedure for working with 2 picture sequences. | Prepare materials in advance. Give a child time to familiarise him/herself with teaching materials and comment on them if needed before starting the learning activity. Give lots of praise. Correct mistakes gently! You can also look confused if the child tells the story in the wrong order. For children who are having difficulties grasping the connection between the picture sequence and an actual event, start with simple sequences you can actually act out - such as pouring a drink - and match a picture with each step of the sequence - e.g. (1) empty glass, full bottle, (2) pouring from bottle into the glass, (3) full glass, half empty bottle. |
| Photos of school life FIRST/NEXT/LAST template Photos of familiar aspects of school life (use a digital camera to take photos) | To help the child build links between the pictures and real events and their order, show them the pictures when the events are actually happening. |
Language of order in space eg first last middle end
| Activity/strategy name and materials required | How to do the activity | Key principles for doing the activity and comments |
|---|---|---|
| Sammy Snake's Shopping Toy snake (or some other character) Basket 3 each of fruit, vegetables, cooked foods. Whiteboard and pen | 1. Set out the food in a row of 3, each different type on a different table. 2. Explain to the children that Sammy Snake is hungry, but doesn't know the names of the foods. He needs them to listen to what he says and go and get him the food he wants, in the basket. 3. The children take it in turn to go shopping with the basket. Sammy gives instructions e.g. 'I want the first fruit and the last vegetable'. 4. The children can take a turn to be Sammy. | |
| Monkey's Washing Monkey (or some other character) Washing line Pegs Some clothes (dolls clothes are good) | If any of the children have fine motor difficulties, you will need to help them with the pegs. You can also leave 3 pegs on the line to help with this. | |
| Wind up toys race 3 wind up toys 'beginning' 'middle' 'end' written on cards and finishing line ribbon First next last written on pictures of gold silver and bronze medals | Make sure the course isn't too long! You may need to help the children wind up the toys. You could keep score - e.g. how many times each toy came first / last. You could video them with a digital camera to add interest if necessary, or to use later. This activity will also help to build the link between order in space and order in time: the first toy over the line (time) will also be the first toy in the line of toys (space). | |
| Visual Timetable The visual timetable used in class, or in your small group / 1:1 session | This is not an activity in itself, but is easy to do when you are using the visual timetable. By doing this activity you are helping to build the link between order in space - the order of the items on the visual timetable - and order in time - the order in which the items are actually done. | |
| Life cycles Pictures sequences of simple animal life cycles First next last, beginning middle end prompt card / frame | This activity helps to build the link between order in time - the order in which simple events happen - and order in space - the order in which you put the steps in these events down on paper using the pictures. For more activities to build links between a sequence of pictures and events, see: sequences three pictures showing a practical activity and picture sequencing". |
Before and after in time
| Activity/strategy name and materials required | How to do the activity | Key principles for doing the activity and comments |
|---|---|---|
| Do the actions Imagination! | Play Simon Says, but change the rules. The important thing is not 'Simon' or 'no Simon' it is to get the actions right. Make sure you use the concepts 'before' and 'after' in the instructions and that the children do the steps in the same order that you do them. E.g. 'touch your head after you jump on the spot'. | At first you should choose to either work on "before" or "after". Once the children respond to each concept appropriately when used individually, use them contrastively, i.e. mix instructions containing "before" with others containing "after". Initially you may need to provide plenty of model responses yourself, you may need to build up the sentence to show how they work: for example say "jump on the spot", then "touch your head after you jump on the spot". Make sure the child listens to the whole instruction before doing it. Make sure that you give each instruction in one go, and not as several short ones. |
| What happened? | Initially provide the sentence to the student in a written format so that they can re-read the sentence and then circle what happened first in one colour and what happened second in another colour. If the student has difficulties with reading these sentences, put a picture symbol above each part of the sentence, for example someone eating a sandwich above "I ate my sandwich", an appropriate symbol for "after" and a picture symbol for "I finished my drink". Software is available for creating sentences like this, for example: https://symboliser.commtap.org. As the student becomes more confident provide the sentence with no visual support. |
Activities to develop understanding of the concepts front and back
| Activity/strategy name and materials required | How to do the activity | Key principles for doing the activity and comments |
|---|---|---|
| Draw a picture - Paper and drawing materials - Object that looks different at the front/back. | 1. Ask you child to look at the item in front of them and draw a picture of it. 2. Now turn the object around and ask them to take a look at it from the back, and to draw it again. 3. Talk about the pictures using the words "front" and "back" in your descriptions. Ask your child to say which ones show the back of the figure and which ones the front. | |
| Jump on board game |
Activities to help develop understanding and use of the words 'left' and 'right' on own body
| Activity/strategy name and materials required | How to do the activity | Key principles for doing the activity and comments |
|---|---|---|
| Prompt poster Sheet of paper (A4 size or larger) Pens/ pencils/ crayons etc. | 1. Explain that it can be difficult to tell which is your left hand and which is your right, but that there are some things we can do to help us. 2. Encourage the child to put out their hands palms downwards, with the fingers together and the thumbs extended at right angles. 3. Encourage the child to look for a capital "L" formed by the index finger and thumb. This will be on the left hand. Explain that the one on the right is backwards. 4. Help the child to draw round each hand with their thumb extended, with both hands on the same piece of paper. Help the child to write the words "left" and "right" on the correct hand shape. 5. Help the child to write a large capital L shape on the left hand following the index finger and thumb. Use a contrasting colour to do this. 6. Ask the child to draw a pen or pencil beside the hand they write with. If the child is right handed, you can remind them that "your right hand is the hand you write with; your left hand is the one that is left". This does not work for left-handed children. 7. If possible, ask the child to identify something visual to help tell their left or right hand and draw it on their poster. This could be their watch or a freckle, for example. | When it's finished, put the poster in a visible place to act as a prompt for the child. You may need several copies if the child works in different locations. Remind the child to use their strategy to tell which is left and which is right when they get stuck. |
| Following instructions Object with a distinctive look and feel (I use a painted wooden egg) Blindfold (optional) | You can give tactile feed back if the child is struggling to tell right and left. Touch them gently, but firmly on the right arm and say, "this is right". Touch them gently, but firmly on the left arm and say, "this is left". Understanding "left" and "right" on someone else is more difficult. To make it easier, make sure the child giving the instructions is following the child to whom they are giving instructions so that "left" and "right" for both children is the same. If the child giving instructions stays still then this is a much harder task - this equates to working at Level 3 (8 to 9 year old typical development). |
pupils use words left and right on objects in front of them
| Activity/strategy name and materials required | How to do the activity | Key principles for doing the activity and comments |
|---|---|---|
| Put it there One large object such as a toy bus, house etc. Several smaller objects e.g. toy animals Prompt cards saying "left" and "right" | 1. Put the large object in the centre of the table in front of the child. 2. Ask the child to identify the left side and the right side. Help if necessary. 3. Put the "left" and "right" prompt cards to the left and right of the object. 4. Give the child instructions such as "put the lion to the right of the bus" 5. Swap roles so that the child has a chance to give the instructions. 6. When the child is fairly proficient at carrying out the activity with the prompt cards, try the activity with no prompts. | The child should be able to understand and refer to left and right when talking about their own body first (see "understand and use words left and right on own body"). You should sit next to the child so their left/right is the same as your left/right. Note: if you are sitting opposite the child and want them to refer to your left and right this is a more difficult task: this equates to working at Level 3 (8 to 9 year old typical development). |
| "Draw it" barrier activity Paper Pens Cards with pictures of two items drawn next to each other, e.g. car and cat, tree and house | ||
| Matching pairs Matching pairs cards. Visual prompt for left, right, up and down like this: ↑ up ←left right→ down ↓ | Sit next to the child so that your left is the same as their left. Note: if you are sitting opposite the child and want them to refer to your left and right this is a more difficult task: this equates to working at Level 3 (8 to 9 year old typical development). Use an appropriate number of pairs for the age and ability of the child. If the child struggles with giving instructions using up/down, put the cards in one long horizontal line and work only on "left" and "right". Vary your starting point so the child has the opportunity to use all the direction words. You can use the words further and nearer instead of up and down, if it is more appropriate, but you must be consistent in which word you choose. |
Support Commtap to keep it online
Thank you for visiting Commtap.
Please read this message as it is extremely important.
- Visitor donations mean we can continue to host over 1,000 free activities to support speech, language, and communication development.
- Visitor donations mean we can continue to provide free resources to address a wide range of communication needs, including limited speech or language, interaction challenges, and needs associated with conditions such as developmental language disorder, autism, and cerebral palsy.
- Visitor donations mean we can continue to provide resources to support the work of speech and language therapists, teachers, teaching assistants, parents, and carers.
- Visitor donations mean we can continue to provide the free key word sign dictionary (bks.org.uk) which has over 2,000 Makaton and Signalong signs.
We know that not everyone is able to afford to pay to access these resources, however, if you can, please make a donation to keep the site going.
Thank you

Google ads on this page are provided by Google Adsense - and their presence does not imply any endorsement by Commtap. Report a problem with an ad on this page. Log in (for free) to avoid seeing Google ads.