Search
User login
Topic “Activities”
This sheet contains activities.
Using a target sound in a small phrase
| Activity/strategy name and materials required | How to do the activity | Key principles for doing the activity and comments |
|---|---|---|
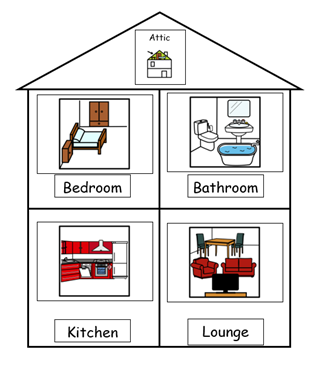
| Where in the house? Barrier Game - 2 copies of words containing your child's target sound - click here for printable word cards. - 2 x copies of house game board
|
| If your child is able to do this activity you might like to try moving on to: saying a longer sentence with the target word in, e.g target word = 'carrot', your sentence could be, 'put the carrot in the kitchen'. Click here for activities using target sounds in sentences.
If your child is finding this activity challenging, move back to using games that focus on saying the target sound in a single word. Once your child is confident at saying the target sounds in a single word, try this activity again. Click here for single word activities set 1. |
| Speech sound barrier game - 2 x page of words for your target speech sound or - 2 x page of minimal pairs pictures for your target speech sound - A barrier to put up between you and your child - Some counters in a variety of colours- 2 of each counter. | Using the minimal pairs pictures will be harder as your child will have to work out which word to use, e.g. tea/key. If your child is able to do this activity you might like to try moving on to: saying a longer sentence with the target word in, e.g target word = 'carrot', your sentence could be, 'put the carrot in the kitchen'. Click here for activities using target sounds in sentences.
If your child is finding this activity challenging, move back to using games that focus on saying the target sound in a single word. Once your child is confident at saying the target sounds in a single word, try this activity again. Click here for single word activities set 1. |
Listening to words in stories and work out whether they are correct/incorrect
| Activity/strategy name and materials required | How to do the activity | Key principles for doing the activity and comments |
|---|---|---|
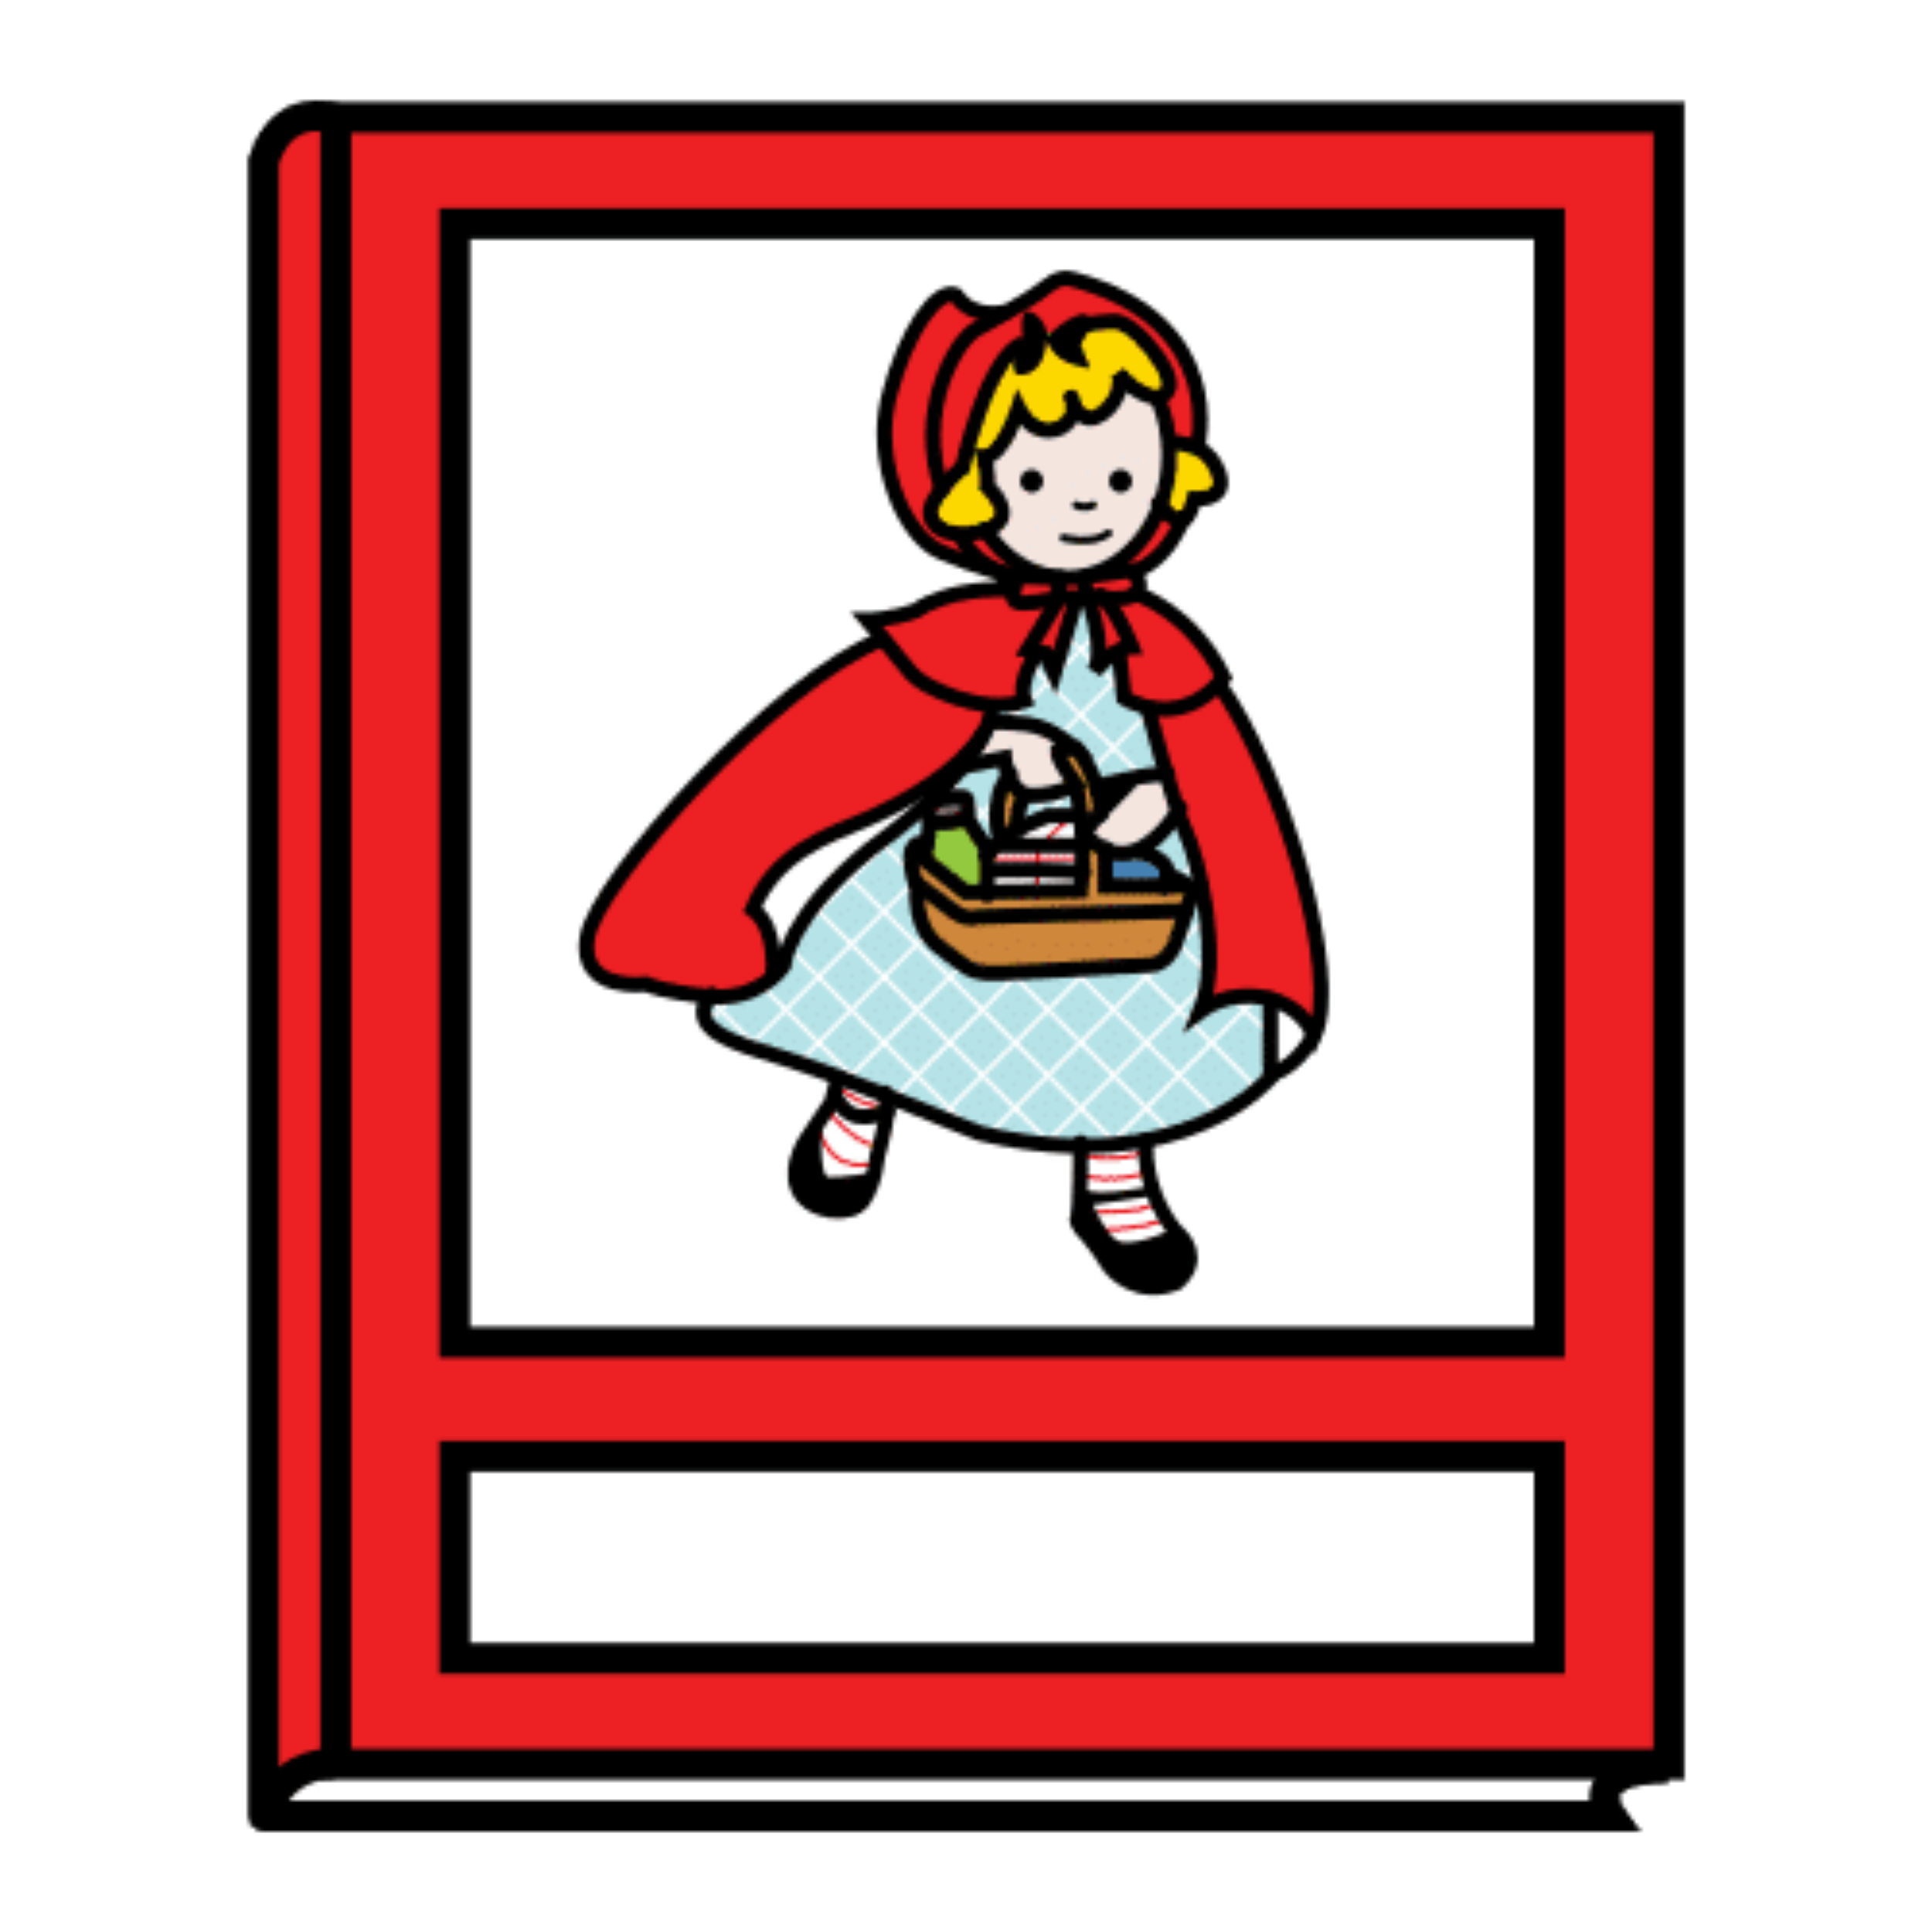
| Puppet Story - Puppet - Story book - Stickers |
|
Using a target sound in a single word - activities/games set 1
| Activity/strategy name and materials required | How to do the activity | Key principles for doing the activity and comments |
|---|---|---|
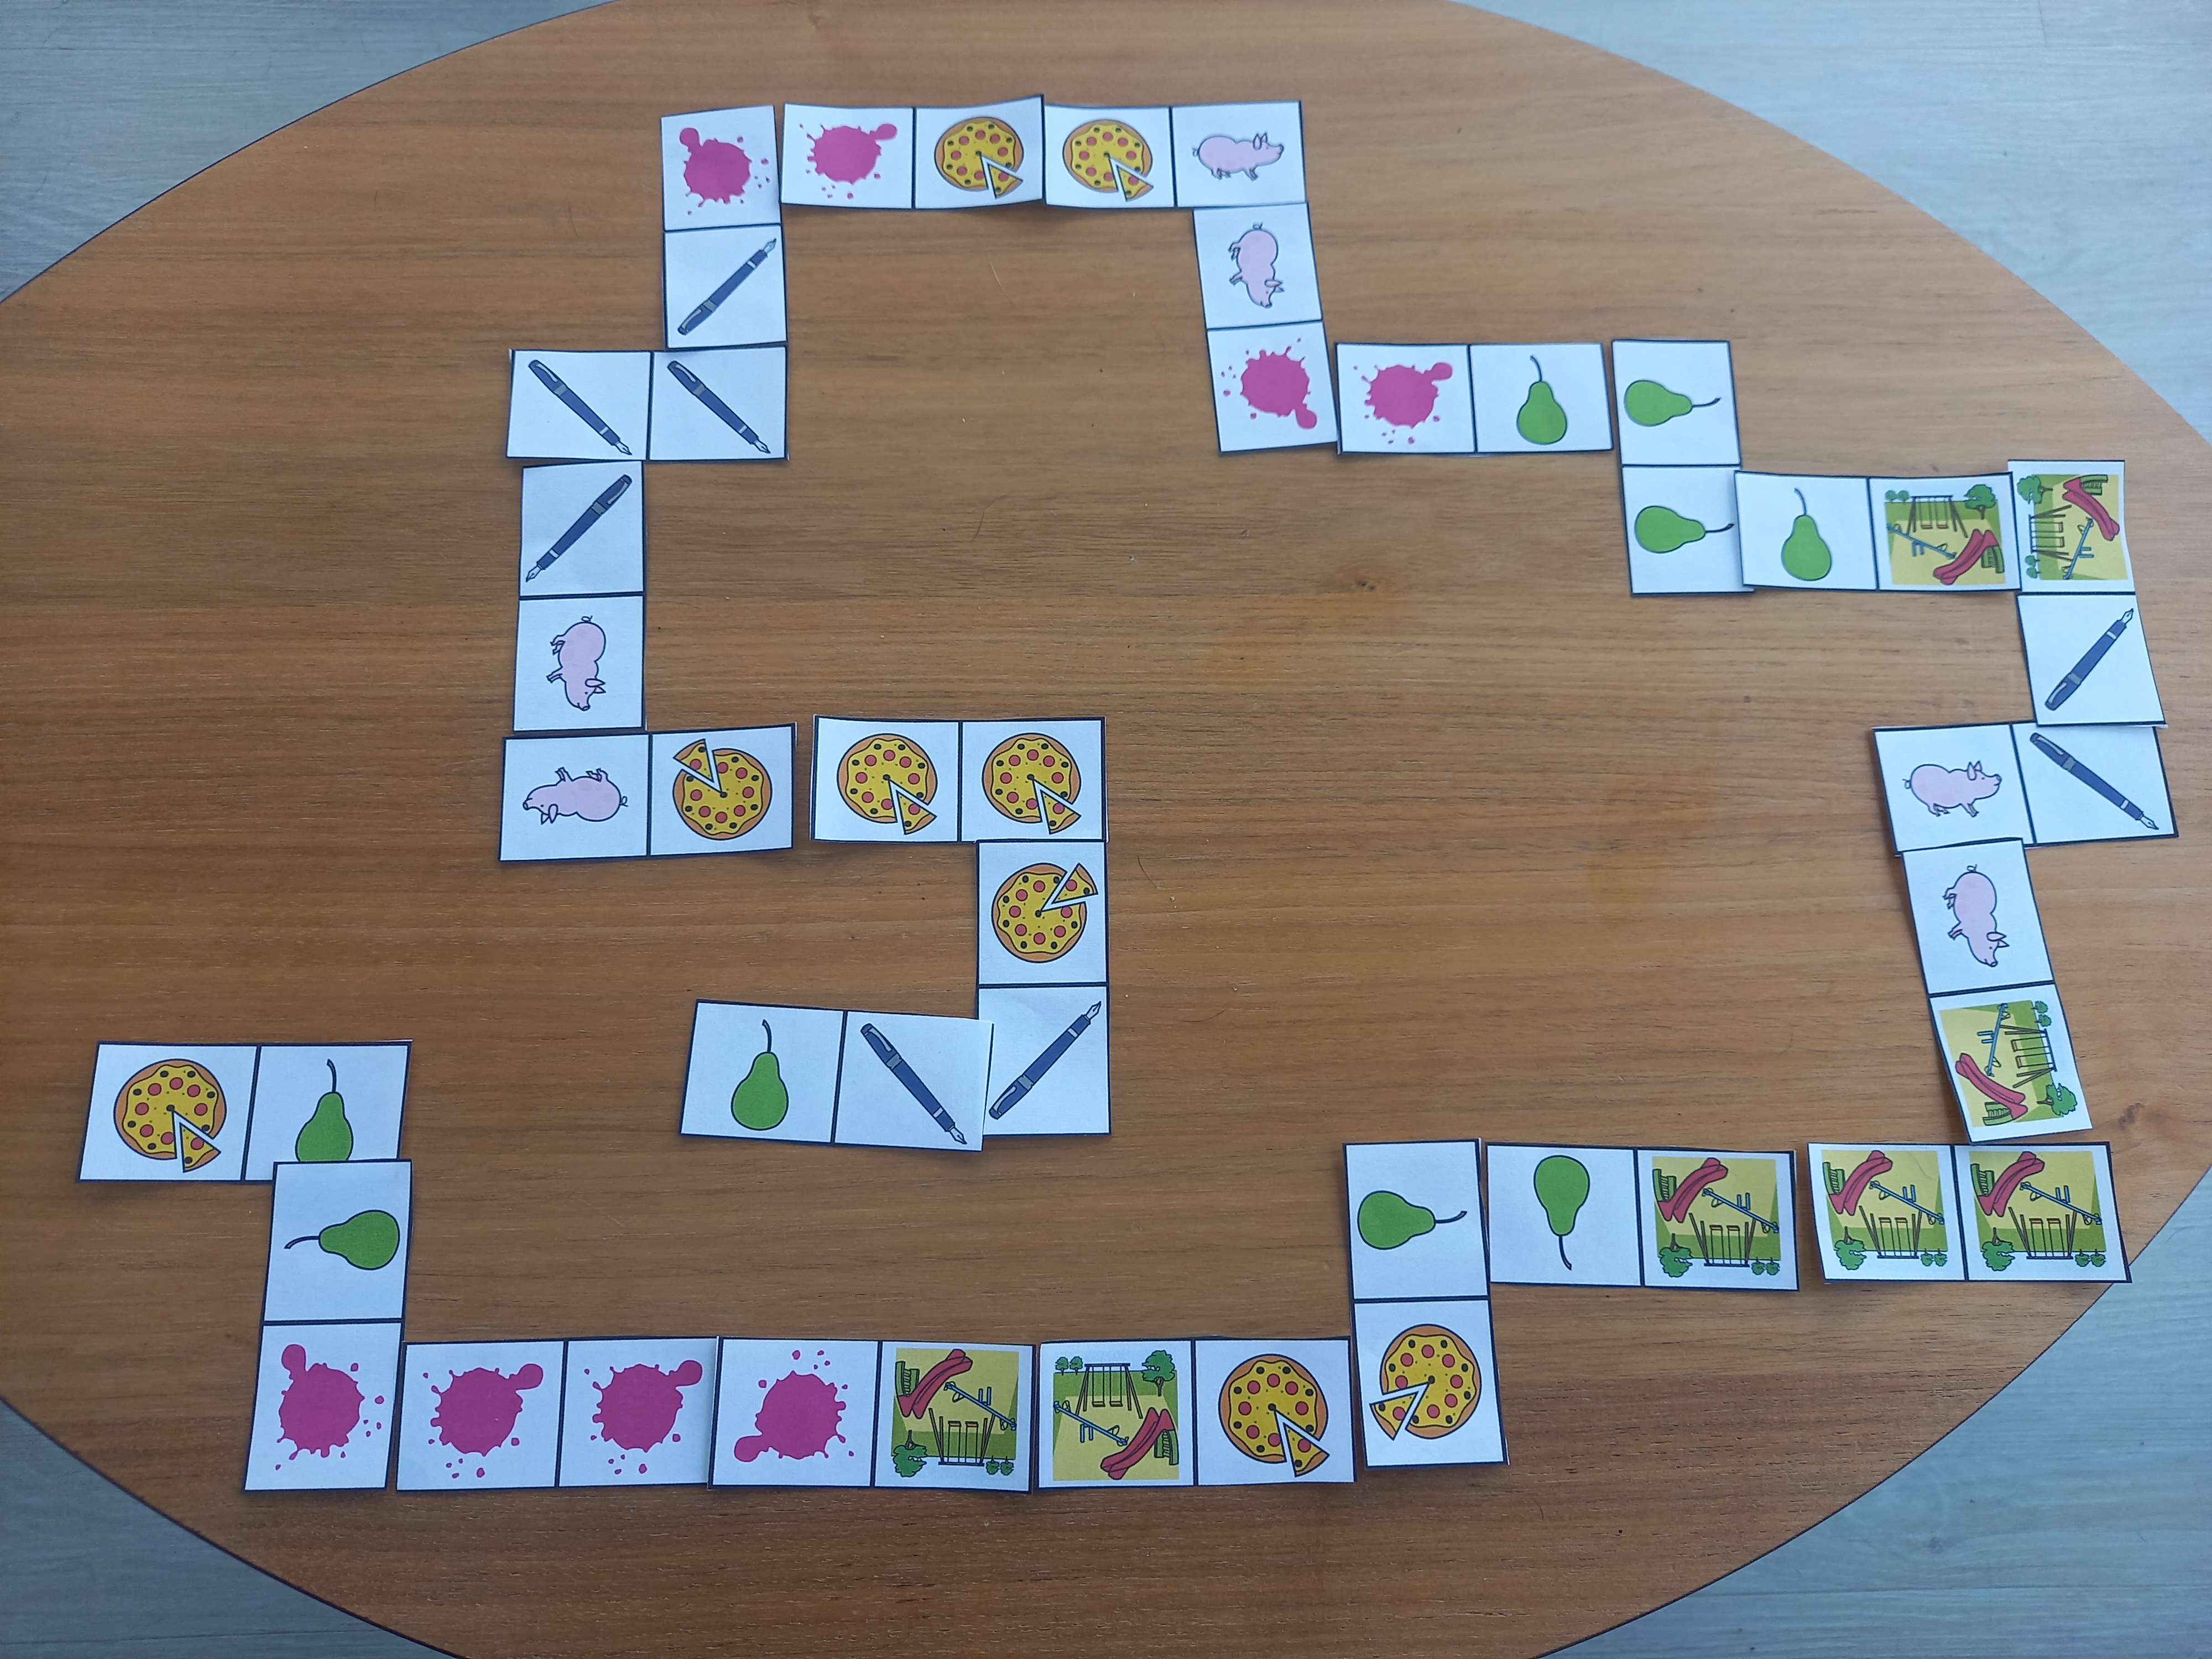
| Sound Dominoes |
| If your child is able to do this activity you might like to try moving on to: saying a small phrase with the target word in, e.g target word = 'car', your phrase could be, 'a red car'. Some phrase level activities can be found by clicking here.
If your child is finding this activity challenging, try the following steps: - If your child finds it challenging to say the sound, praise them for trying and say the word back with the sound used correctly for them to hear. - Talk about the sound the word starts with, e.g. 'cat' starts with a 'c' sound. - Have a go at breaking the word up for the child to copy, e.g. 'let's try and say this together, 'c' 'at'. |
| 4 in a Row! - Printable template with playing board and counters. - Words containing your child's target sound - click here for printable word cards. | If your child is able to do this activity you might like to try moving on to: saying a small phrase with the target word in, e.g target word = 'car', your phrase could be, 'a red car'. Some phrase level activities can be found by clicking here.
If your child is finding this activity challenging, try the following steps: - If your child finds it challenging to say the sound, praise them for trying and say the word back with the sound used correctly for them to hear. - Talk about the sound the word starts with, e.g. 'cat' starts with a 'c' sound. - Have a go at breaking the word up for the child to copy, e.g. 'let's try and say this together, 'c' 'at'. | |
| Washing Line - Strong string or rope - pegs - Words containing your child's target sound - click here for printable word cards. - small bag to put picture cards in | If your child is able to do this activity you might like to try moving on to: saying a small phrase with the target word in, e.g target word = 'car', your phrase could be, 'a red car'. Some phrase level activities can be found by clicking here.
If your child is finding this activity challenging, try the following steps: - If your child finds it challenging to say the sound, praise them for trying and say the word back with the sound used correctly for them to hear. - Talk about the sound the word starts with, e.g. 'cat' starts with a 'c' sound. - Have a go at breaking the word up for the child to copy, e.g. 'let's try and say this together, 'c' 'at'.
| |
| What's in the bag? Guessing Game - Words containing your child's target sound - click here for printable word cards. - bag | If your child is able to do this activity you might like to try moving on to: saying a small phrase with the target word in, e.g target word = 'car', your phrase could be, 'a red car'. Some phrase level activities can be found by clicking here.
If your child is finding this activity challenging, try the following steps: - If your child finds it challenging to say the sound, praise them for trying and say the word back with the sound used correctly for them to hear. - Talk about the sound the word starts with, e.g. 'cat' starts with a 'c' sound. - Have a go at breaking the word up for the child to copy, e.g. 'let's try and say this together, 'c' 'at'. | |
| Kim's Game - Words containing your child's target sound - click here for printable word cards. - A blanket or tea towel | If your child is able to do this activity you might like to try moving on to: saying a small phrase with the target word in, e.g target word = 'car', your phrase could be, 'a red car'. Some phrase level activities can be found by clicking here.
If your child is finding this activity challenging, try the following steps: - If your child finds it challenging to say the sound, praise them for trying and say the word back with the sound used correctly for them to hear. - Talk about the sound the word starts with, e.g. 'cat' starts with a 'c' sound. - Have a go at breaking the word up for the child to copy, e.g. 'let's try and say this together, 'c' 'at'. |
Hearing the difference between sounds in words (auditory discrimination)
| Activity/strategy name and materials required | How to do the activity | Key principles for doing the activity and comments |
|---|---|---|
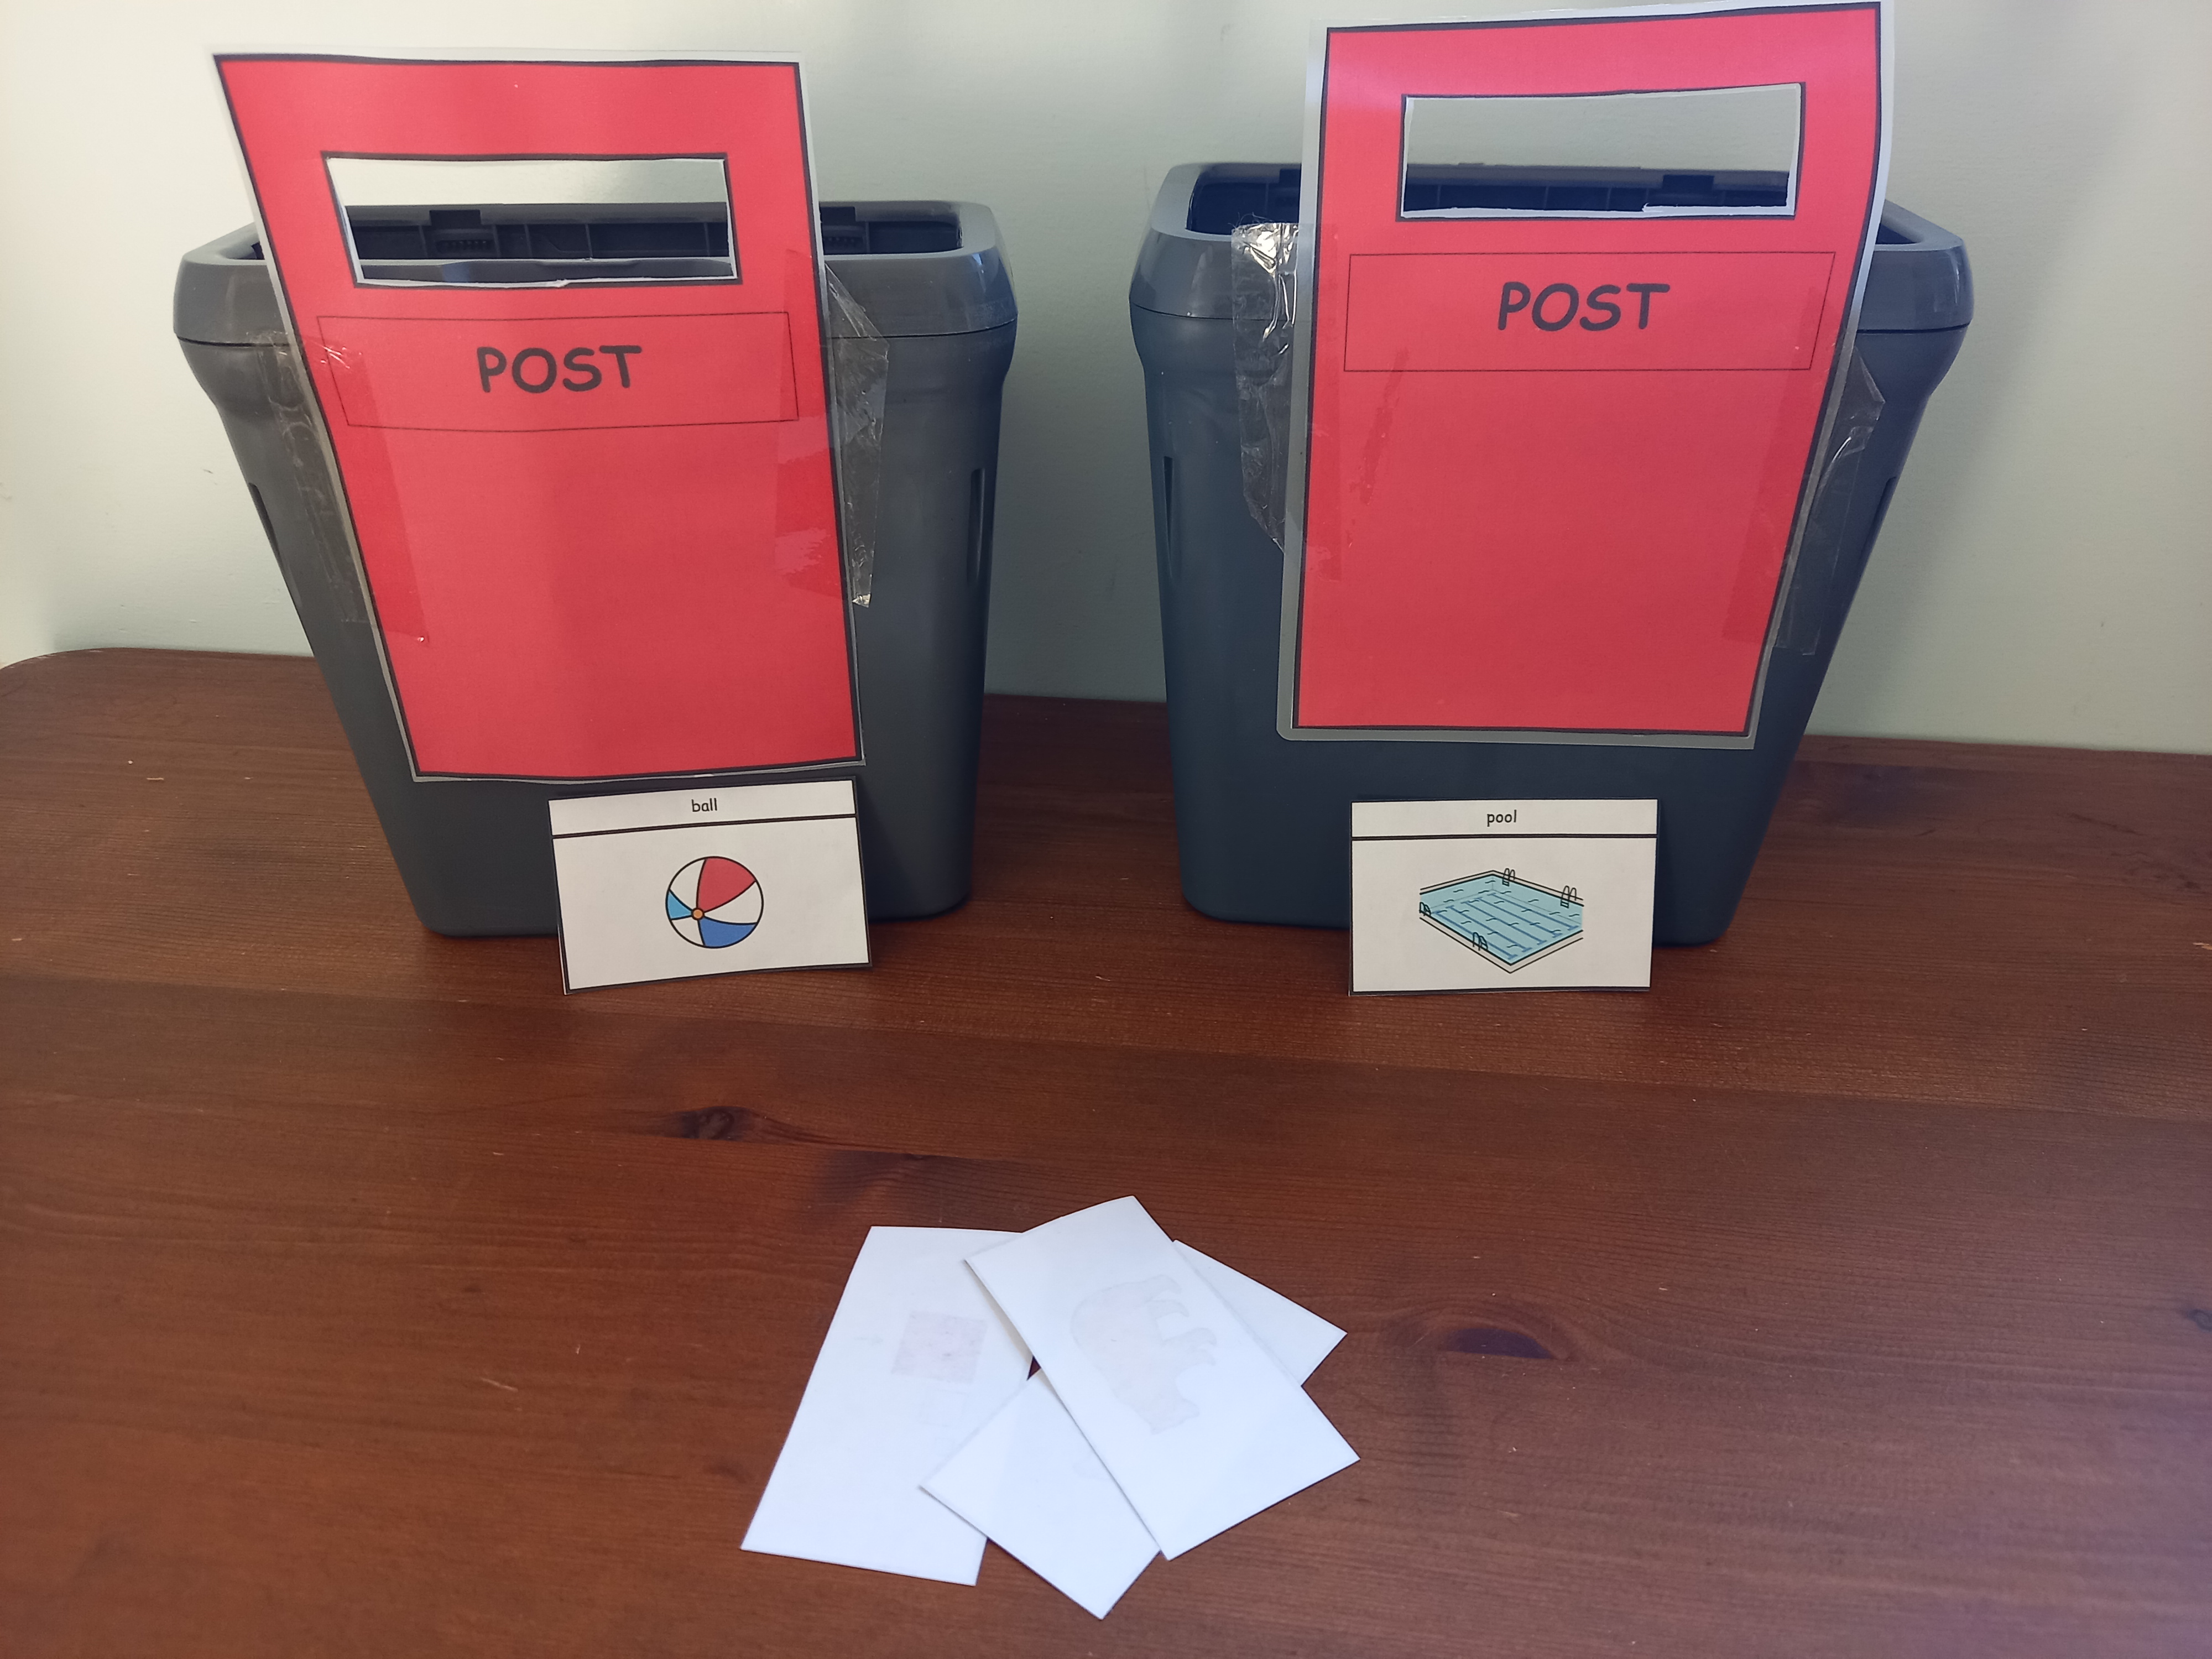
| Post it! Materials: - Copy of printable minimal pairs words for the target sounds – if you are unable to print, you could draw some pictures using the pairs of words on the list. - 2 boxes/containers – you could make your own post boxes using this template and sticking it to a cardboard box. - Paper cut into envelope shapes or click here for a printable template. | Instructions: 1. Choose one pair of words, e.g. ‘door’ and ‘saw’ and attach one to the front of each box/container. 2. Explain to your child that each of the boxes has a word with a different sound. You are going to say a word and they have to post a letter into the right box. 3. Show your child how to do this. 4. Say the words in a random order so your child has to listen to the difference between the word and choose the correct one. 5. If your child gets the wrong word, talk it through with them and show them which sound you used. 6. Swap minimal pairs after a while, e.g. change ‘door’ and ‘saw’ to ‘duck’ and ‘suck’.
| |
| Racing Cars - 2 x pieces of paper and pen - 2 x toy cars or vehicles - Copy of printable minimal pairs words for the target sounds – if you are unable to print, you could draw some pictures using the pairs of words on the list. | ||
| Block Towers - some wooden/plastic building blocks. - Copy of printable minimal pairs words for the target sounds – if you are unable to print, you could draw some pictures using the pairs of words on the list.
|
For child to look at their peers and use their names when in a turn taking activity
| Activity/strategy name and materials required | How to do the activity | Key principles for doing the activity and comments |
|---|---|---|
| Play a game with adult supervision Marble run; Bricks for sharing building and knocking down a tower; Any lotto game where pictures have to be matched; Skittles; Pushing cars down a run/pipe. pictures of children taking part |
| Keep turns short and snappy so children don't need to wait too long. Keep the time spent on the whole game short and snappy so children don't get bored. Support good waiting by saying "you are waiting..." sometimes the child will find it easier to wait if they have something to hold while they wait - this could be a waiting symbol.
|
Makes a choice when offered (items)
| Activity/strategy name and materials required | How to do the activity | Key principles for doing the activity and comments |
|---|---|---|
| Choosing Between Toys - Desired and undesired toys, other objects | To begin with hold out a liked toy and a neutral object like a piece of paper - encourage the child to reach for what they want. When they can do this consistently hold out two toys - encourage the child to reach to choose. | Vary which side you hold the toys out to ensure that the child doesn't always reach in one direction. Occasionally, when the child has been reaching for what they want swap the toys around and see whether they still reach for the same one. Always label what they choose for example "snake ... you want the snake...". |
| Choosing Between Food - Two types of food | As above Always label what the child chooses or reaches for. For example: 'Oh, rice, mmmm' Make appropriate sounds like 'mmmmmm', 'yum yum' etc. |
Use a simple conversational structure over three turns
| Activity/strategy name and materials required | How to do the activity | Key principles for doing the activity and comments |
|---|---|---|
| How are you? | Two turns
Three turns Once two turns is mastered as above, move to three turns:
| For the three turns part, if a student makes a different response to the answer to their question than one of the possible responses on the prompt cards then that's fine as long as it is relevant. Otherwise, prompt them to make a response from one of the prompt cards. You could show different prompt cards, or you could show just one prompt card for the response in the last turn. |
| What have you been doing? | For this activity, a student using a contraction of the question is also fine (e.g. "What doing"), this activity is about creating turns in a conversation. | |
| Topic of interest - what have you got? Prompt cards for a "what have you got" conversation Set of pictures (e.g from Google) relating to a topic of interest to the student - e.g. Tesco, the park, Eastenders. |
Simple topic maintenance
| Activity/strategy name and materials required | How to do the activity | Key principles for doing the activity and comments |
|---|---|---|
| My interests |
| |
| Topic introduction
| ||
| Talk about it
| Optional:
| |
| Likes and dislikes Something to record the students responses on (e.g. paper/pen) which can later be used as a prompt; Soft ball or beanbag. | To make it harder, you can go around again asking for favourite drinks - so that everyone now has to remember a food and a drink for each student when they pass the ball (e.g "Tim - (you like) carrot cake and tea"). You could use favourite games, favourite places to go, etc. instead. | |
| What have you done today? Way of recording students responses - e.g. paper/pen, whiteboard/marker; Soft ball or beanbag. |
Select a picture on an eye gaze frame
| Activity/strategy name and materials required | How to do the activity | Key principles for doing the activity and comments |
|---|---|---|
| Picture pairs Plastic perspex sheet with hole in the middle, around 40cm x 30cm (e.g "E-tran frame"); Two sets of everyday picture cards - or whatever the student is interested in. |
| If the student has difficulties, you can try pointing it at each position on the frame - starting from their top left and working across and down - say "is it here" at each position ("no!") - until you get to the right position, say "yes" "here's the....". Say "look at the....", then ask them and say "where was the....?" - taking your eyes slowly to the position - trying to take the student's eyes with you. When you get there, take it off, pretend to eat it (for example) and then put it on the "done" pile with the other card. More ideas about this here from Call Scotland. Going further When a student can do this with one picture, try adding more pictures on the frame (distractor pictures). Start with two, then three/four (one on each corner), then gradually up to seven (each corner and the middle of each side except the bottom side. Put the target card - the one you are working on - in one of the positions you are using. |
| Find the picture/item Plastic perspex sheet with hole in the middle, around 40cm x 30cm (e.g "E-tran frame"); Two sets of everyday picture cards - or whatever the student is interested in. | If the student has difficulties, you can try pointing it at each position on the frame - starting from their top left and working across and down - say "is it here" at each position ("no!") - until you get to the right position, say "yes" "here's the....". Say "look at the....", then ask them and say "where was the....?" - taking your eyes slowly to the position - trying to take the student's eyes with you. When you get there, take it off, and pretend to eat it/drive it etc. More ideas about this here from Call Scotland. Going further When a student can do this with one picture, try adding more pictures on the frame (distractor pictures). Start with two, then three/four (one on each corner), working up to seven (each corner and the middle of each side except the bottom side. Put the target card - the one you are working on - in one of the positions you are using. | |
| Confirmation using a "special spot" Plastic perspex sheet with hole in the middle, around 40cm x 30cm (e.g "E-tran frame"); Two sets of everyday picture cards - or whatever the student is interested in. | The idea of this activity is for the student to learn how they can confirm a choice. It is necessary to have some way of them confirming a choice because:
All these will make it difficult to be sure what they are trying to communicate. The "special spot" (which could for example be a red circle stuck in the bottom middle of the frame) can be a point that a student to look to to:
|
Responds to who what and why
| Activity/strategy name and materials required | How to do the activity | Key principles for doing the activity and comments |
|---|---|---|
| The who/what/why sheet Sheet with 3 columns, one headed "who?", one headed "what?", one headed "why?" Brick cube 'Wh' word symbols You can make these resources using the Commtap Symboliser for PowerPoint. |
|
Responds to why questions
| Activity/strategy name and materials required | How to do the activity | Key principles for doing the activity and comments |
|---|---|---|
| Emotions picture cards Picture cards with emotions Optional - choice of pictures showing possible reasons - for example a picture of a boy who has fallen over to go with a picture of a boy who is crying. |
| |
| Why is it.... One or more pictures showing scenes - for example someone running away, a hot beach. Or... Pictures in a book. | ||
| A desirable and a non-desirable toy Two toys one desirable and one not. |
Responds to what questions
| Activity/strategy name and materials required | How to do the activity | Key principles for doing the activity and comments |
|---|---|---|
| Familiar picture books
|
| WARNING: it can become a habit to keep asking a child "what's that" whenever you see a picture (a phenomenom that might be called "What's that-ing") - so use in moderation - and, in other situations, try leaving long pauses for a child to tell you about a picture rather than asking a specific question. When the child is able to understand this question, you could try taking it in turns so that they get a go at asking you "what's that?". |
| Silly questions One or more of these:
... and if required: "What" symbol card |
Responds to who questions
| Activity/strategy name and materials required | How to do the activity | Key principles for doing the activity and comments |
|---|---|---|
| Familiar picture books
|
| Teach these concepts using repeated phrases and matching them as much as possible with the relevant symbol. Allow thinking time. Reward any attempts. |
| Photos of people One or more of these:
...and if required:
| You may need to give the child a language model before he/she can ask a 'who' question. | |
| Who is around? A situation where there are other people - for example in class, in the playground. "Who" symbol card if required. |
Activities to develop the pronouns 'him' and 'her'.
| Activity/strategy name and materials required | How to do the activity | Key principles for doing the activity and comments |
|---|---|---|
| Play with dolls A male doll A female doll 2 identical sets of items, e.g. toy food, counters, any small items.
| 1. Explain to the child that you are going to play a game that will help them learn 'him and 'her. 2. Set out the dolls and the items. Explain that you call the male doll 'him' and the female doll, 'her'. 3. Give you child instructions - e.g. give the cup to him, give the plate to her. 4. After a few turns, ask your child to give you an instruction using the word 'him' or 'her'. | Before woring on him/her, make sure your child can understand and use he/she - click here for activities to develop these concepts. |
| Him/her sorting game |
makes marks
| Activity/strategy name and materials required | How to do the activity | Key principles for doing the activity and comments |
|---|---|---|
| Imitates vertical strokes Writing tools and paper Washing up brush and bucket of water Sand tray Play dough | (1) Start by making big vertical strokes with a washing up brush and a pail of water outside on a fine day. Say "Down ... down" (2) Give the brush to the child (3) Reward any attempts to make a downward stroke for example with clapping, praise etc. (4) Follow this procedure in the sand or in a rolled out piece of play dough etc. (5) Use a chunky crayon (not too long) and a piece of paper. Say 'Down ......down.' (6) Give the crayon to the child (7) Reward success with praise or reward toys. (8) Use a ruler to make two vertical tramlines on the page and then help the child draw between the lines in a downward motion. (9) Draw two or three tramlines on a page well spaced - and see if the child can start at the top and draw down. (10) Draw big dots in a downward line and make the starting off dot big and red. Model for the child drawing a downward line roughly along this line of dots. You may need to start the child off and stop half way down the line for the child to complete. (11) Use different colours and writing tools to make the task more interesting. Reward attending to the task with social praise or a reward toy. |
Support Commtap to keep it online
Thank you for visiting Commtap.
Please read this message as it is extremely important.
- Visitor donations mean we can continue to host over 1,000 free activities to support speech, language, and communication development.
- Visitor donations mean we can continue to provide free resources to address a wide range of communication needs, including limited speech or language, interaction challenges, and needs associated with conditions such as developmental language disorder, autism, and cerebral palsy.
- Visitor donations mean we can continue to provide resources to support the work of speech and language therapists, teachers, teaching assistants, parents, and carers.
- Visitor donations mean we can continue to provide the free key word sign dictionary (bks.org.uk) which has over 2,000 Makaton and Signalong signs.
We know that not everyone is able to afford to pay to access these resources, however, if you can, please make a donation to keep the site going.
Thank you

Google ads on this page are provided by Google Adsense - and their presence does not imply any endorsement by Commtap. Report a problem with an ad on this page. Log in (for free) to avoid seeing Google ads.